Configuring SSO for Workday using OAuth On-Behalf-Of flow
You can integrate watsonx Orchestrate with any enterprise application that supports token exchange and Single Sign-On (SSO). This set up enables users to access third-party applications through watsonx embedded chat using their own credentials.
The diagram explains how watsonx Orchestrate connects with the following components:
An identity provider (IdP), such as Microsoft Entra ID (Entra ID). The same approach applies to other identity providers that support token exchange and Single Sign-On (SSO).
A third-party enterprise application, like Workday.
An application that hosts the embedded chat
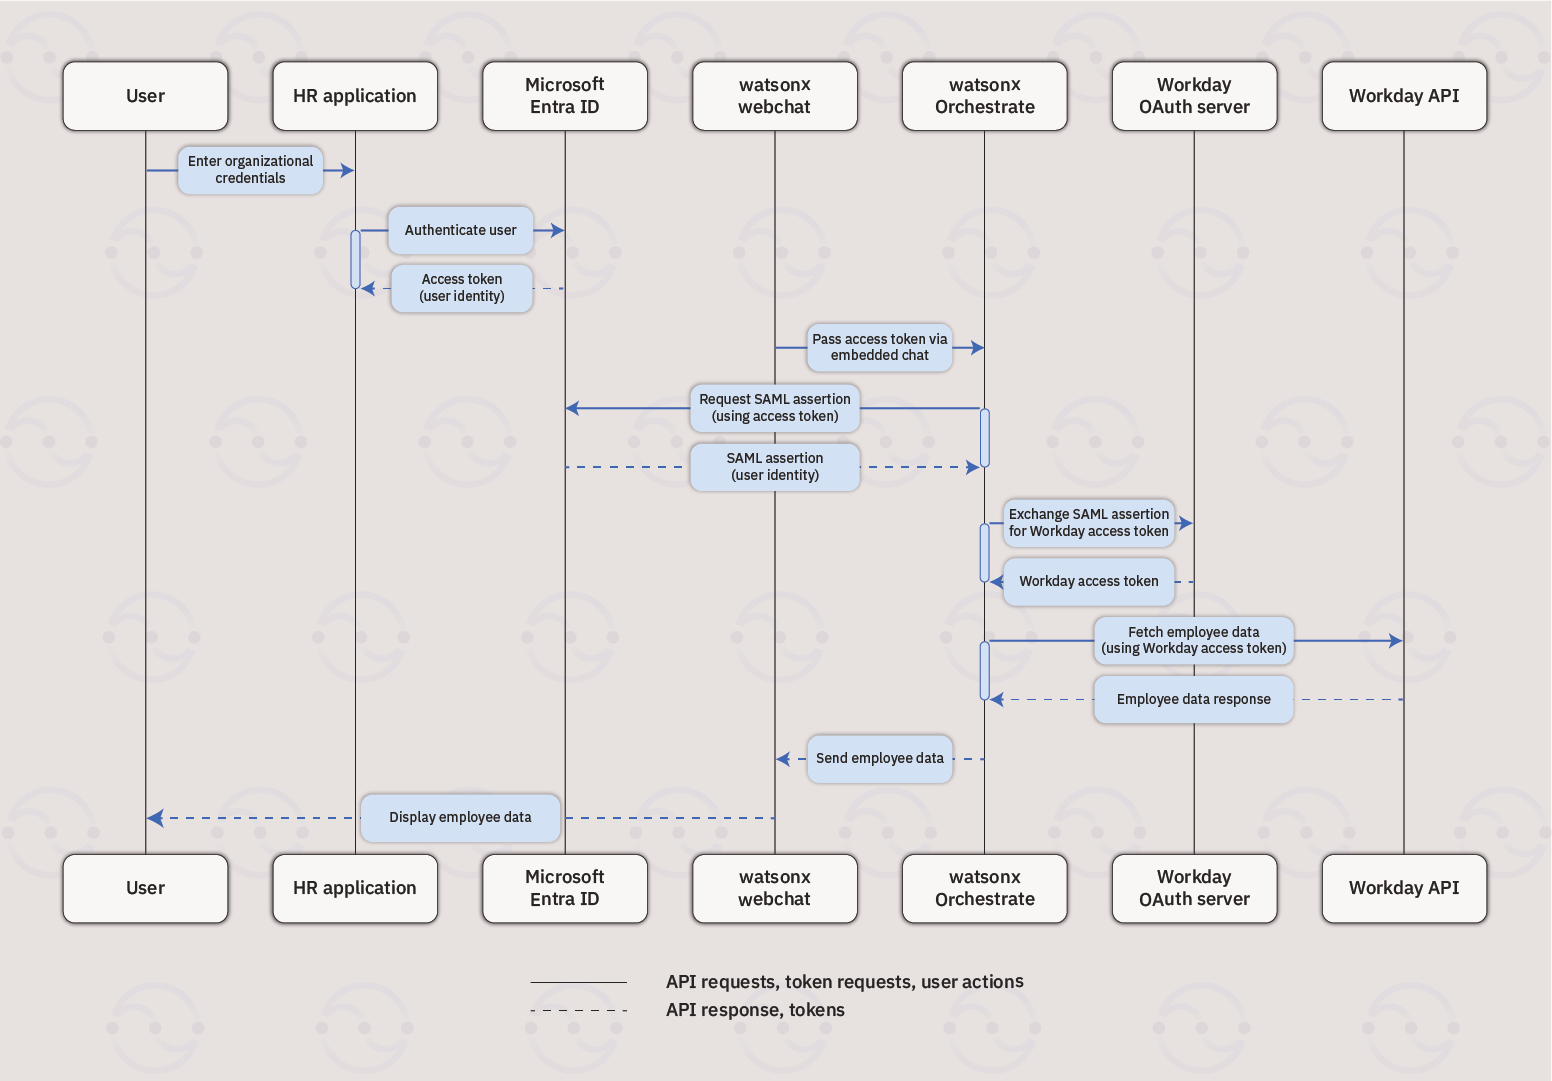
This flow uses OAuth 2.0 On-Behalf-Of (OBO) to exchange tokens and enable secure access to data.
User authentication: The user logs into the application that hosts the embedded chat using their own credentials. The IdP authenticates the user and returns an access token.
Token propagation through embedded chat: The application that embeds watsonx Orchestrate web chat, receives the access token from IdP and passes it to watsonx Orchestrate.
Exchange tokens:
watsonx Orchestrate:
Requests a SAML assertion from the IdP using the access token.
Exchanges the SAML assertion for an access token from the enterprise application’s OAuth server.
API access:
watsonx Orchestrate uses the enterprise app’s access token to call its API (for example, Workday API) and retrieve data.
Response:
The API response is returned to the user through the embedded chat in the application.
Tutorial: Connecting watsonx Orchestrate to Workday using Entra ID
The tutorial guides you to configure Single Sign-On (SSO) for Workday using Entra ID and the OAuth 2.0 On-Behalf-Of (OBO) flow with watsonx Orchestrate. This integration lets you manage authentication centrally while giving users direct, secure access to Workday without separate logins.
Replace <entra_app_client_id>, <entra_app_client_secret>, <entra_directory_tenant_id>, <workday_api_client_id>, <username_of_user> and <password_of_user> with the appropriate information.
2
Add permissions to access the Workday API
Before you can exchange tokens and access Workday APIs using Entra ID, you need to configure the permissions for your app in Microsoft Entra.
a. Open Microsoft Entra admin center and navigate to App registrations.
b. Select your application used for token exchange.
c. Go to API permissions and select Add a permission.
d. Choose the Workday API.
e. Select Delegated permissions and add the required scopes.
Set up the connection between Workday and watsonx Orchestrate
You can configure Workday connection in two ways: either import a configuration file or set up the connection directly in the CLI. Using a configuration file is the recommended approach.
Use a configuration file
a. Create a configuration file called as connections.yaml.
b. Insert the following code into the connections.yaml file.
orchestrate connections configure \--app-id workdayapp \--env live \--type team \--kind oauth_auth_on_behalf_of_flow \--server-url https://example.workday.com/ccx/api/v1/tenant1
Replace <app-id> with the ID of your web page or application that hosts the embedded chat. The kind flag ensures that the connection uses the OBO flow.
Make sure the client ID and token URL match those provided in your Workday API registration.
6
Add watsonx Orchestrate web chat to your application
a. After the configuration is complete, embed the watsonx Orchestrate web chat to your web page or application. For detailed instructions on embedding the web chat, refer to Enabling Secure Embed Flow.
b. To enable SSO, in addition to the embed instructions, complete the following steps:
Create a createJWT.js and an embed.html files in your watsonx Orchestrate repository.
Use the examples provided in the following tabs as templates for each file.
Copy
Ask AI
const fs = require('fs');const RSA = require('node-rsa');const crypto = require('crypto');const jwtLib = require('jsonwebtoken');const express = require('express');const path = require('path');const { v4: uuid } = require('uuid');const router = express.Router();// If you want to generate your own private/public key pair, you can use commands like the following.//// ssh-keygen -t rsa -b 4096 -m PEM -f example-jwtRS256.key// openssl rsa -in example-jwtRS256.key -pubout -outform PEM -out example-jwtRS256.key.pub// *** DO NOT USE THE PUBLIC AND PRIVATE KEYS FROM THIS EXAMPLE FOR PRODUCTION USE! ***// This is your private key that you will keep on your server. This is used to sign the jwt. You will paste your public// key into the appropriate field on the Security tab of the web chat settings page. IBM watsonx Assistant will use your// public key to validate the signature on the jwt.const PRIVATE_KEY = fs.readFileSync(path.join(__dirname, '../keys/<jwt-key>'));// This is IBM's public key and can be found on the Security tab of the web chat settings page. This is only necessary// if you wish to encrypt a user payload in your jwt. The code below will use this key to encrypt the user payload// inside the JWT.const IBM_PUBLIC_KEY = fs.readFileSync(path.join(__dirname, '../keys/ibmPublic.key.pub'));// A time period of 45 days in milliseconds.const TIME_45_DAYS = 1000 * 60 * 60 * 24 * 45;/*** Generates a signed JWT. The JWT used here will always be assigned a user ID using the given anonymous user ID. If* the user is authenticated and we have session info, then info about the user will also be added to the JWT. We* always use the anonymous user ID even if the user is authenticated because IBM watsonx Assistant doesn't allow you to* change the user ID in the middle of a session.*/function createJWTString(anonymousUserID, sessionInfo) { // This is the content of the JWT. You would normally look up the user information from a user profile. const jwtContent = { // This is the subject of the JWT which will be the ID of the user. // // This user ID will be available under integrations.channel.private.user.id in dialog and // system_integrations.channel.private.user.id in actions. sub: anonymousUserID, // This object is optional and contains any data you wish to include as part of the JWT. This data will be // encrypted using IBM's public key so it will not be visible to your users. IBM watsonx Assistant will decrypt this // data and make it available to use in your assistant. woUserId: '<wo_user_id>', woTenantId: '<wo_tenant_id>', user_payload: { custom_message: 'This is a secret, encrypted message!!', name: 'Username', custom_user_id: Username_ID, sso_token: <sso_token>, }, }; // If the user is authenticated, then add the user's real info to the JWT. if (sessionInfo) { jwtContent.user_payload.name = sessionInfo.userName; jwtContent.user_payload.custom_user_id = sessionInfo.customUserID; } // const dataString = JSON.stringify(jwtContent.user_payload); if (jwtContent.user_payload) { // Example code snippet to encrypt sensitive data in JWT payload. // If there is a user payload, encrypt it using the IBM public key // and base64 format. const dataString = JSON.stringify(jwtContent.user_payload); const utf8Data = Buffer.from(dataString, 'utf-8'); // convert utf-8 to byte-stream // Encrypt the data const rsaKey = new RSA(IBM_PUBLIC_KEY); jwtContent.user_payload = rsaKey.encrypt(utf8Data, 'base64'); } // // Encrypt the data // const encryptedBuffer = crypto.publicEncrypt( // { // key: IBM_PUBLIC_KEY, // padding: crypto.constants.RSA_PKCS1_OAEP_PADDING, // oaepHash: 'sha256' // Specify OAEP padding with SHA256 // }, // Buffer.from(dataString, 'utf-8') // ); // // Convert encrypted data to base64 // jwtContent.user_payload = encryptedBuffer.toString('base64'); console.log(jwtContent.user_payload) // Encrypt the user payload. // const rsaKey = new RSA(IBM_PUBLIC_KEY); // jwtContent.user_payload = rsaKey.encrypt(jwtContent.user_payload, 'base64'); // Now sign the jwt content to make the actual jwt. We are giving this a very short expiration time (10 seconds) // to demonstrate the web chat capability of fetching a new token when it expires. In a production environment, // you would likely want to set this to a much higher value or leave it out entirely. const jwtString = jwtLib.sign(jwtContent, PRIVATE_KEY, { algorithm: 'RS256', expiresIn: '10000000s', }); return jwtString; } /** * Gets or sets the anonymous user ID cookie. This will also ensure that an existing cookie is updated with a new 45 * day expiration time. */ function getOrSetAnonymousID(request, response) { let anonymousID = request.cookies['ANONYMOUS-USER-ID']; if (!anonymousID) { // If we don't already have an anonymous user ID, then create one. Normally you would want to use a full UUID, // but for the sake of this example we are going to shorten it to just five characters to make them easier to read. anonymousID = `anon-${uuid().substr(0, 5)}`; } // Here we set the value of the cookie and give it an expiration date of 45 days. We do this even if we already // have an ID to make sure that we update the expiration date to a new 45 days. response.cookie('ANONYMOUS-USER-ID', anonymousID, { expires: new Date(Date.now() + TIME_45_DAYS), httpOnly: true, }); return anonymousID; } /** * Returns the session info for an authenticated user. */ function getSessionInfo(request) { // Normally the cookie would contain a session token that we would use to look up the user's info from something // like a database. But for the sake of simplicity in this example the session cookie directly contains the user's // info. const sessionInfo = request.cookies.SESSION_INFO; if (sessionInfo) { return JSON.parse(sessionInfo); } return null; } /** * Handles the createJWT request. */ function createJWT(request, response) { const anonymousUserID = getOrSetAnonymousID(request, response); const sessionInfo = getSessionInfo(request); response.send(createJWTString(anonymousUserID, sessionInfo)); } router.get('/', createJWT); module.exports = router;
Replace the <wo_tenant_id> and <sso_token> with appropriate information.
Parameter
Description
<wo_tenant_id>
Your watsonx Orchestrate tenant ID.
<sso_token>
The SSO token obtained from the Entra ID.
Run the following commands to retrieve the SSO token