

Supported providers
- When you import a model from OpenRouter, always set the
max_tokenparameter explicitly. If you omit this parameter, the system defaults to 65536 tokens. This high token count can cause the request to fail if you do not have enough credits. - GPT-OSS-120b is a non-IBM product governed by a third-party license that may impose use restrictions and other obligations. By using this model, you agree to the terms. Read the terms.
Understanding virtual models
You can configure watsonx Orchestrate to register an external model or provider as a virtual model. Consider the following important limitations before you proceed.Compatibility and support
Not every model and provider combination is supported or tested. The supported providers list shows providers that have been tested, but this does not guarantee that every model on every listed provider works. Consider the following:- New models and API changes: Models are released frequently, and some introduce API specification changes that can cause runtime errors.
- Intermediate infrastructure: Components in the request path between watsonx Orchestrate and the provider (such as gateways, proxies, or adapters) can introduce incompatibilities or special authentication requirements that watsonx Orchestrate does not support.
- Model suitability: Not all models are suited for agentic workflows. Even when a model registers successfully and runs without errors, the results might not be accurate enough for business-critical agents.
Optimized support
watsonx Orchestrate provides optimized support for:- gpt-oss-120b via Groq or AWS Bedrock
- gpt-oss-120b via watsonx.ai in GovCloud environments (available in the April mid-release)
Testing requirements
When you register virtual models with other providers, allocate sufficient time to validate that the combination works correctly. Testing can identify incompatibilities that prevent the agent from functioning as expected.Using custom provider endpoints
If you self-host an LLM or use a model proxy or gateway as a pass-through to another provider, you can use OpenAI chat completion compatibility. This section covers authentication options for custom endpoints.OpenAI-compatible with API key authentication
The default base URL for theopenai provider is https://api.openai.com/v1. For self-hosted OpenAI-compatible endpoints, ensure that your full URL ends with /chat/completions, but exclude this path when you provide the custom_host during registration.
Authentication format:
Define the model specification
/chat/completions in the custom_host value.Register the model
OpenAI-compatible with OAuth 2.0 authentication
For self-hosted OpenAI-compatible endpoints that use OAuth 2.0 client credentials authentication, use theopenai-oauth2-client-creds provider type. Use this option when your OAuth token endpoint is separate from your LLM inferencing endpoint.
Prerequisites: Your LLM inferencing URL must meet the following requirements:
- End with
/chat/completions(per the OpenAI spec) - Accept OAuth tokens in the request header:
Authorization: Bearer your-access-token
Create OAuth connection
Register the model
/chat/completions from the custom_host value.CLI Reference
- Importing from a file
- Using the CLI only
orchestrate models import command.Define the model specification file
Create an API key connection
Add the model
--file(-f): File path of the spec file containing the model configuration.--app-id(-a): The app ID of akey_valueconnection containing provider configuration details. These will be merged with the values provided in theprovider_configsection of the spec.--skip-validation: Skip the automatic post-import validation check. See Validating virtual models for details.
Validating virtual models
Theorchestrate models validate command tests whether a registered virtual model has the capabilities that are required for agentic behavior in watsonx Orchestrate. The command runs automatically after orchestrate models import and orchestrate models add for virtual models, and you can also run it on demand.
--name(-n): The name of the virtual model to validate. The name must match the registered model name exactly, including thevirtual-model/prefix.--verbose(-v): Output full JSON results including per-test responses and tool call details.
What is tested
The command runs four test cases that cover the capabilities required by the watsonx Orchestrate agent runtime:Limitations
Understanding the output
After the command runs, a summary table and a per-test results table are displayed. Each test shows a success or failure status and a duration in milliseconds. If any test fails, the overall result isfailed. The model remains registered regardless of the outcome. Review the failing test cases to determine whether the model is suitable for your use case.
The following are common failure patterns:
- All tests fail with an HTTP error (for example, a 404): The model name might be incorrect, the model might not exist at the provider, or your credentials might not have access to it. Verify the model name and your connection credentials.
- Inference tests pass but tool calling tests fail: The model can respond to prompts but does not support function or tool calling. Because tool calling is required for agentic behavior in watsonx Orchestrate, this model cannot be used as an agent LLM.
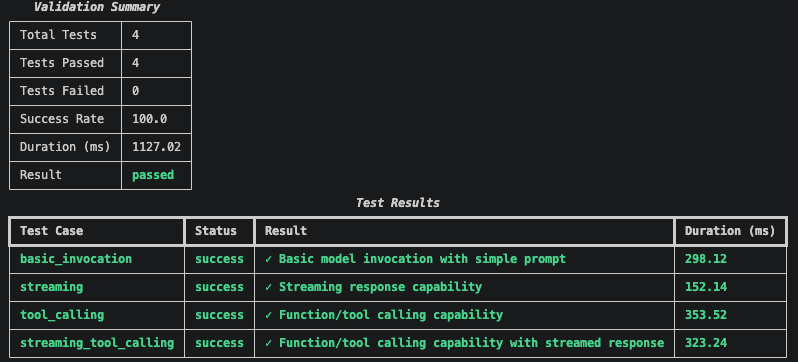
All four tests passing — the model is suitable for use as an agent LLM
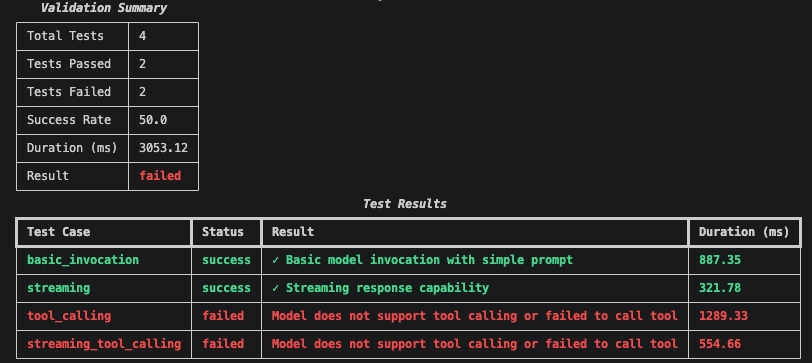
Partial failure — the model supports inference but not tool calling
--verbose (-v) to get the full JSON output, which includes the raw model response, error codes, and tool call details for each test case:
Skipping automatic validation
Bothorchestrate models import and orchestrate models add run validation automatically after a successful registration. To skip validation, pass the --skip-validation flag:
- You are scripting bulk imports and plan to validate separately by using
orchestrate models validate. - The model endpoint is temporarily unavailable at import time.
- You do not want to wait for validation to complete during import.
Examples using the supported providers
The following sections provide examples and supported schemas for each model provider.OpenAI
OpenAI
provider_config field of the model. Values from
a connection will be merged with the provider_config.Define the model specification file
Create an API key connection
Add the model
watsonx.ai
watsonx.ai
provider_config field of the model. Values from
a connection will be merged with the provider_config.Define the model specification file
config block. See Required config parameters for gpt-oss-120b for details.Create an API key connection
--provider-config flag in the orchestrate models add command. For more information, see Using the CLI only.Add the model
- Provide one of:
watsonx_space_id,watsonx_project_id, orwatsonx_deployment_id. - Include
watsonx_cpd_url,watsonx_cpd_username,watsonx_cpd_passwordonly for on-prem (CPD) setups. - When you register Deploy on Demand (DoD) models, explicitly provide the model configuration. Set these configuration values according to the model’s requirements because they are not automatically transferred during inference from watsonx Orchestrate.
Groq
Groq
provider_config field of the model. Values from
a connection will be merged with the provider_config.Define the model specification file
config block. See Required config parameters for gpt-oss-120b for details.Create an API key connection
Add the model
Anthropic
Anthropic
provider_config field of the model. Values from
a connection will be merged with the provider_config.Define the model specification file
Create an API key connection
Add the model
Google Gen AI
Google Gen AI
provider_config field of the model. Values from
a connection will be merged with the provider_config.Define the model specification file
Create an API key connection
Add the model
Gemini Enterprise Agent Platform
Gemini Enterprise Agent Platform
- API key authentication is not supported. Use service account JSON authentication instead.
provider_config field of the model.Define the model specification file
Add the model
Azure
Azure
provider_config field of the model. Values from
a connection will be merged with the provider_config.Define the model specification file
Create an API key connection
Add the model
Azure OpenAI
Azure OpenAI
provider_config field of the model. Values from
a connection will be merged with the provider_config.- API key (default)
- Managed Identity
- Microsoft Entra ID
Define the model specification file
Create an API key connection
Add the model
AWS Bedrock
AWS Bedrock
provider_config field of the model. Values from
a connection will be merged with the provider_config.Define the model specification file
Create an API key connection
Add the model
- Provide either the
api_key,aws_secret_access_key, oraws_access_key_id. - Provide the model name in the
namefield. - When you register Deploy on Demand (DoD) models, explicitly provide the model configuration. Set these configuration values according to the model’s requirements because they are not automatically transferred during inference from watsonx Orchestrate.
Mistral
Mistral
provider_config field of the model. Values from
a connection will be merged with the provider_config.Define the model specification file
Create an API key connection
Add the model
OpenRouter
OpenRouter
provider_config field of the model. Values from
a connection will be merged with the provider_config.Create an API key connection
Define the model specification file
Add the model
x.ai
x.ai
provider_config field of the model. Values from
a connection will be merged with the provider_config.Create an API key connection
Define the model specification file
Add the model
Ollama
Ollama
provider_config field of the model. Values from
a connection will be merged with the provider_config.Start ollama
ollama runs under systemctl. Stop it before you start the Ollama server:Get your IP address
Testing your connection
- Run the following curl command to test your connection, replacing
198.51.100.42with the IP address you obtained in the previous step:
- Enter the watsonx Orchestrate Developer Edition gateway container:
- Run the curl command again from within the container shell.
Define the model specification file
ollama, as the API key value.Use your local network IP address as the URL. Ollama does not work if you use localhost or 0.0.0.0 in the model specification file.http://198.51.100.42:11434 with the IP address that you have obtained in the previous step.Add the model
Red Hat AI
Red Hat AI
provider_config field of the model. Values from
a connection will be merged with the provider_config.Define the model specification file
Create an API key connection
Add the model
- On-premises
- SaaS
List all LLMs
Run theorchestrate models list command to see all available LLMs in your active environment.
--raw (-r) flag.Removing custom LLMs
Run theorchestrate models remove command with the --name (-n) flag to specify the LLM to remove.
Exporting custom LLM
Run theorchestrate models export command to export LLMs from your active environment.
Updating custom LLM
To update a custom LLM, remove it and then add it again:Additional configuration options
Setting a default LLM in the UI
If you use an on-premises installation with models provisioned only as virtual models, you can specify which model appears as the default in the user interface. Add thedefault tag under the tags section of a model with the type set to chat.
Setting a default embedding model
If you use an on-premises installation with models provisioned only as virtual models, you can also set a default model for knowledge bases. Add thedefault tag under the tags section of a model with the type set to embedding.
Configuring LLM parameters
Configure additional LLM parameters such as temperature and seed for more control over model behavior. Set these parameters in your agent configuration:seed: Sets a random seed for reproducible outputs (useful for testing and debugging)temperature: Controls randomness in responses (0.0 = deterministic, higher values = more creative)