> ## Documentation Index
> Fetch the complete documentation index at: https://developer.watson-orchestrate.ibm.com/llms.txt
> Use this file to discover all available pages before exploring further.
# Authoring Python-Based Tools
Python tools are one of the most flexible and powerful ways to extend agent functionality in watsonx Orchestrate, especially when combined with **agentic workflows**.
A Python tool consists of one or more Python files. Within these files, you define one or more functions and annotate them with the `@tool` decorator to expose them to Orchestrate.
Each Python tool runs inside an isolated container with its own virtual environment. This design keeps your code and dependencies separate from the host operating system, so you work in a secure and consistent runtime while focusing on your agent’s goal.
**Python tool example**
```python Python theme={null}
#test_tool.py
from ibm_watsonx_orchestrate.agent_builder.tools import tool
@tool()
def my_tool(input: str) -> str:
"""Executes the tool's action based on the provided input.
Args:
input (str): The tool's input.
Returns:
str: The tool's output.
"""
#functionality of the tool
return f"Hello, {input}"
```
The unique name of the tool as it would be referenced by your agent.
*This **defaults** to the name of your python function.*
The name of the tool as it shows up within the "Manage Agents" UI.
Provides a summary of the tool's purpose and functionality. This description helps the LLM determine when and how to use the tool effectively.
*By default, this text is **automatically generated** from the tool’s docstring, but you can override it here if needed.*
Specifies a list of connections along with their expected connection types. Any connection required during the tool's execution must be included in this list. This ensures that all necessary connections are properly defined and bound to the tool at import time.
The app\_id of the connection which this tool is expected to require.
The type of connection(s) (`BASIC_AUTH`, `BEARER_TOKEN`, `API_KEY_AUTH`, `OAUTH2_AUTH_CODE`, ..., `KEY_VALUE`)
this tool is compatible with for this `app_id`.
When compatible with more than one ConnectionType, please ensure the type provided at runtime
is the expected ConnectionType before attempting to fetch its value. This can be done using the following:
```python theme={null}
from ibm_watsonx_orchestrate.run import connections
...
@tool(expected_credentials=[{'app_id': 'my_app', 'type': [ConnectionType.BASIC_AUTH, ConnectionType.OAUTH2]}])
def my_tool():
headers = {}
if connections.get_connection_type('my_app') == ConnectionType.BASIC_AUTH:
conn = connections.basic('my_app')
username = conn.username
password = conn.password
headers['Authorization'] = f"Basic {b64encode(f"{username}:{password}")}"
elif connections.get_connection_type('my_app') == ConnectionType.OAUTH2:
conn = connections.oauth2_auth_code('my_app')
headers['Authorization'] = f"Bearer {conn.access_token}"
```
The kind of Python tool. Set it to `PythonToolKind.TOOL` for general-purpose tools.
This controls the type of schema validation that is done on the tool during import time.
The [JSON Schema](https://json-schema.org/) that the tool's input conforms to.
The JSON Schema is always defined as an object for each of the keyword arguments of the tool and is inferred
automatically by the typings of the Python function.
The description of each argument will be extracted from the docstring (see below note about compatible docstring types).
The type of each argument will be inferred from the field's typings or pydantic type.
The generated value can be inspected by running `orchestrate tools list -v`.
The [JSON Schema](https://json-schema.org/) that the tool's output conforms to. This is automatically inferred from the
return type of the function using either typings or pydantic.
The generated value can be inspected by running `orchestrate tools list -v`.
This field is used to determine whether or not an agent would confirm each action before performing it, if the type
was not `ToolPermission.READ_ONLY`.
*This behavior has been deprecated and removed; it no longer occurs.*
**Best Practices:**
* Use Google-style docstrings to apply descriptions and document the Python tool.
* Python tool functions should be defined as async functions.
* Python tools calling out to any external services should use async http/client libraries like aiohttp or httpx. Otherwise concurrent requests will be blocked for the duration of the I/O period and have poor latency.
* For compute/memory capabilities of the containers in which the python tools run, see importing the python-tookit docs.
For more information, see [Python tool design principles](/tutorials/performance/performance-guide-v2-tools#python-tool-design-principles).
### Auto-discover
The ADK can convert ordinary Python files into Python tools that are ready to be uploaded to Orchestrate. The process automatically imports and adds a `@tool` decorator and generates a docstring for functions in the source file.
For docstring generation, an LLM is invoked, so the command requires an environment (`.env`) file with valid credentials for Groq, watsonx, or Orchestrate.
To convert a Python file, use the following command:
```bash BASH theme={null}
orchestrate tools auto-discover --file path\to\python\file --output path\to\output\file --env-file .env --llm groq/openai/gpt-oss-120b --function name_of_function1 --function name_of_function2
```
The command takes the following arguments:
Path to the Python file to convert.
Path to save the converted file.
Path to the environment file containing credentials used for inference.
Specifies the model to use for inference.
Explicitly designates the functions to convert; this flag can be passed multiple times to specify more than one function.
* The `auto-discover` feature is standalone but also bundled with the import process.
* This option takes all the flags of the standalone `auto-discover` command except `--output`.
* The ADK runs the auto-discover process and uploads the results instead of writing to a file.
* If you are using AI Gateway, the model name must start with virtual-model or virtual-policy and you must pass it with the --llm flag.
* The auto import process does not support toolkit imports. To complete your import, generate the output file and then run the toolkit import command.
## Importing Python-based tools
You can import Python-based tools in two forms: as an individual tool or as a toolkit.
When you import a tool as an individual tool, you add a single Python tool to watsonx Orchestrate and manage it independently.
When you import tools as a toolkit, you group multiple Python tools into one toolkit and manage them together as a single unit.
**Choosing between standalone tools and toolkits:**
The choice between standalone Python tools and Python toolkits significantly impacts performance and operational characteristics:
**Standalone Python tools:**
* Process-per-invocation model (\~100-300ms overhead per call)
* Supports non-thread-safe operations
* Suitable for infrequent calls or prototyping
**Python toolkits:**
* Shared process model (no process overhead after startup)
* Requires thread-safety
* Better performance for frequently called tools
* Dedicated resources in live premium environments
For detailed guidance on choosing the right approach, see [Choosing a tool type](/tools/toolkits/choosing_tool_type).
For step-by-step migration from standalone tools to toolkits, see [Migrating to Python toolkits](/tools/toolkits/migrating_to_toolkits).
After you create your Python tools, import them as a Python toolkit. A Python toolkit groups related tools so you can deploy and run them together in a single Python process. To meet this goal, design every tool in the toolkit to be thread-safe and reentrant. This approach gives you faster execution because the tools share the same process.
When you run Python tools outside a toolkit (as standalone Python tools), the system starts a lightweight process each time the tool runs. This design supports tools that use non-thread-safe operations, but it increases execution time by approximately 100-300ms per invocation compared to a toolkit.
**When to use Python toolkits vs standalone Python tools:**
* **Use Python toolkits** when you have multiple related tools that are thread-safe, called frequently, or share dependencies
* **Use standalone Python tools** when tools use non-thread-safe operations, are called infrequently, or need process isolation
For detailed guidance, see [Choosing a tool type](/tools/toolkits/choosing_tool_type).
To create a Python toolkit, place all required Python tools in one folder. Each tool can include one or more Python files. In those files, define your functions and apply the `@tool` decorator so watsonx Orchestrate exposes each function as a usable tool.
You can place tools that multiple agents use into a single toolkit. When you update tools inside a toolkit, redeploy all related agents to the live environment so you use the updated versions. Choose the number of tools in each toolkit based on the level of concurrent requests you expect. For more information, see [CPU and memory allocation for Python toolkits](#cpu-and-memory-allocation-for-python-toolkits).
### CPU and memory allocation for Python toolkits
**Draft environment:**
* All imported Python toolkits and Python tools run in a single Kubernetes deployment container per tenant
* Process overheads per tool call exist in draft (approximately 100-300ms per invocation)
* Container resources: 2 vCPUs, 2 GB of memory, and 5 workers
* Deployment supports two replicas
**Live environment (premium plan):**
* You can import up to five Python toolkits per tenant
* Each toolkit runs in its own dedicated Kubernetes deployment container
* **No process overheads per tool call** - tools run in a persistent process
* Container resources per toolkit: 2 vCPUs, 2 GB of memory, and 5 workers
* Each deployment supports two replicas
* Supports up to 10 concurrent requests per toolkit (5 workers × 2 replicas)
**Live environment (non-premium plan):**
* Similar to draft environment with shared container model
* Contact support to request premium access for dedicated toolkit containers
**Performance optimization:** In live premium environments, Python toolkits eliminate process startup overhead, reducing tool execution time by 100-300ms per call compared to standalone Python tools. For frequently called tools (>10 calls/minute), this can significantly improve agent response times.
### Add Python toolkits using the ADK CLI
Use the `orchestrate toolkits add` command to add a Python toolkit.
```bash BASH theme={null}
orchestrate toolkits add \
--kind python \
--name \
--description \
--tier \
--package_root
```
The type of toolkit to import. For Python toolkits, use
`python`.
The name of the toolkit.
The description for the toolkit.
The path for the toolkit.
The `app_id` to of a connection to associate with this toolkit. **Only `key_value` connections are supported.** Each key and value within the connection will be exposed as environment variables to the mcp server. For more information, see [Connections](../../connections/overview).
Assigns a dedicated deployment tier to the Python toolkit. This option applies only when --kind is set to python.
### Import Python toolkits from a file
You can also import a Python toolkit from a YAML file. This file defines the same configuration options as the add command and fits well into import scripts and CI/CD pipelines.
Use the `orchestrate toolkits import` command to import a toolkit from a file.
```bash BASH theme={null}
orchestrate toolkits import -f --app-id
```
Path to the YAML specification file that defines the toolkit.
The `app_id` to of a connection to associate with this toolkit. **Only `key_value` connections are supported.** Each key and value within the connection will be exposed as environment variables to the mcp server. For more information, see [Connections](../../connections/overview).
For the YAML file, configure the following:
The version of the YAML specification.
The type of toolkit. For Python toolkits, use `python`.
The name of the toolkit.
The description of the toolkit.
Key-value pairs for the toolkit.
**Example:**
```yaml toolkit_name.yaml theme={null}
spec_version: v1
kind: python
name: toolkit_name
description: A toolkit sample
environment:
key1: value1
```
### Thread-safety requirements
All tools in a Python toolkit must be thread-safe because they run in a shared process with concurrent requests. A tool is thread-safe when multiple threads can call it simultaneously without causing race conditions or data corruption.
**Thread-safe patterns:**
* No global mutable state
* Use immutable data structures
* Employ proper async/await patterns
* Use thread-safe libraries
**Non-thread-safe patterns to avoid:**
* Global variables that change
* File system writes
* Non-thread-safe libraries
* Shared database connections without pooling
For detailed guidance on thread-safety and migration from standalone tools, see [Migrating to Python toolkits](/tools/toolkits/migrating_to_toolkits).
To import a individual Python tool use the `orchestrate tools import` command using the `-f` flag to specify which python file
contains your tool definitions. Each `@tool` annotated in the given file will be exposed as a tool within your
active watsonx Orchestrate environment.
It is recommended to include only a single `@tool` annotated function per file so that tools can be imported independently.
**Performance consideration**: Standalone Python tools start a new process for each invocation, adding approximately 100-300ms overhead. If your tool is called frequently (more than 10 times per minute) and is thread-safe, consider migrating to a Python toolkit for better performance. See [Migrating to Python toolkits](/tools/toolkits/migrating_to_toolkits).
```bash BASH theme={null}
orchestrate tools import -k python -f my-tool.py -r requirements.txt -a app1 -a app2
```
The kind of tool to import, this is always `python` for Python based tools.
The path to the file of the openapi spec you want to import (or a URL containing the file).
The ADK converts Python files into tools that can be uploaded to Orchestrate. It adds a @tool decorator and generates docstrings for functions in the source file.
Use `--safe` to add a confirmation step before updating or importing a tool that already exists. This option prevents accidental overwrites by prompting you to confirm before the command proceeds.
For multi-file Python tools, this is the root folder of the package to upload. All files within this package root folder will be included in the Python tool imported into the runtime.
One or more application ids of a [connection](/connections/overview) which can be used to authenticate against this endpoint. To bind this tool to more than one application id, repeat this flag for each app\_id.
Additionally, if a tool was written expecting one app\_id but your version of orchestrate expects another, you can remap the application name by using `-a app_name_in_tool=app_name_in_wxo_instance`.|
The ADK converts Python files into tools that can be uploaded to Orchestrate. It adds a @tool decorator and generates docstrings for functions in the source file.
## Additional features of Python tools
If your Python function relies on external libraries or packages, specify these dependencies in the `requirements.txt` file to make sure your tool runs correctly.
**Important**: Dependencies listed in `requirements.txt` are **source specifications only** — they define which packages to install, not the binary packages themselves. The actual packages are downloaded and installed server-side at deployment time. For details, see [Python dependency management](/tools/python_dependency_management).
When you import Python-based tools, watsonx Orchestrate validates all packages against a tenant-specific Python package allowlist. This validation limits installations to approved packages only.
During import, watsonx Orchestrate verifies each dependency and version in requirements.txt against the allowlist. If the allowlist lacks a required package or the exact version you specify, the import fails. watsonx Orchestrate runs this validation only at import time. To add or update allowed Python packages, configure the Python tool allowlist through the API. Fore more information see [Package Configuration](https://developer.ibm.com/apis/catalog/PRODUCT--watsonorchestrate--custom-assistants--1.0.40__85a075611f7d04f6170e935f0def11daef49cb5fd9c980150b6ac4fe557daeba--token/api/API--watsonorchestrate--agentic-experience#Retrieve_Python_Package_Allowlist_v1_tenants_package_config_get).
To complete a successful import, follow these rules:
* Declare every dependency in requirements.txt.
* Pin each dependency to an exact version, using this format:
```txt requirements.txt theme={null}
package_name==exact_versionMostrar mais linhas
```
Use this format in:
* `requirements.txt`
* The tenant allowlist configuration
* Add all transitive dependencies to the allowlist.
**Notes:**
* watsonx Orchestrate does not revalidate tools that you already imported when the allowlist changes.
* When allowlist validation is enabled and the allowlist is empty, you cannot use any Python packages.
* Removing all packages from the allowlist does not turn off validation.
**Python tool example**
```python Python theme={null}
import requests
from ibm_watsonx_orchestrate.agent_builder.tools import tool
@tool
def fetch_url(endpoint: str) -> str:
"""Executes a GET request against a given endpoint to fetch its contents.
Args:
endpoint (str): the url to fetch
Returns:
str: the contents of the page
"""
#functionality of the tool
return requests.get(endpoint).text
```
**requirements.txt example**
```text TEXT theme={null}
requests==2.32.4
```
**Enterprise requirements.txt with private registry (Example only, not actual URL)**
```text TEXT theme={null}
--index-url https://artifactory.example.com/api/pypi/python-virtual/simple
ibm-watsonx-orchestrate==2.4.0
requests==2.32.4
```
For more information on the format of a requirements file, see the [official pip documentation](https://pip.pypa.io/en/stable/reference/requirements-file-format/). For enterprise patterns including Artifactory configuration and hash-based verification, see [Python dependency management](/tools/python_dependency_management).
When importing your tool, specify the requirements.txt file by using the -r flag.
```bash BASH theme={null}
orchestrate tools import -k python -f my-tool.py -r requirements.txt
```
Python tools support input and output arguments based on any native Python type from the typings package and classes which
extend BaseModel from the popular library [Pydantic](https://docs.pydantic.dev/latest/).
**Example**
```python PYTHON theme={null}
import requests
from ibm_watsonx_orchestrate.agent_builder.tools import tool
from pydantic import BaseModel
class InputExample(BaseModel):
sample: Optional[str] = Field(None, description="description of my field")
class OutputExample(BaseModel):
result: Optional[str] = Field(None, description="description of my result field")
@tool
def fetch_url(example: InputExample, endpoint: str) -> OutputExample:
"""Executes a GET request against a given endpoint to fetch its contents.
Args:
example: An example input object that takes a sample
endpoint: an example endpoint
Returns:
OutputExample: the example output
"""
#functionality of the tool
return OutputExample(result=requests.get(endpoint).text)
```
Python tools are compatible with the watsonx Orchestrate Connections framework. A connection represents a dependency on an external service
and are a way to associate credentials to a tool such as those for Basic, Bearer, API Key, OAuth, or IDP SSO based authentication flows. Python tools also support
`key_value` connections which as the name implies are arbitrary dictionaries of keys and values which can be used to pass in
credentials for any authorization scheme which does not match one of the existing native schemes.
Connections are referenced by something known as an application id (or `app_id`). This `app_id` is the unique identifier of a connection.
OpenAPI connections can have at most one Connection's app\_id associated to them.
For more information, see [Connections](/connections/overview), and the [expected\_credentials](/tools/create_tool#param-expected-credentials) input to the `@tool` annotation.
In addition to importing a single tool file, it is possible to import an entire folder (package) along with your tool file.
This is useful when you wish to centralize logic into shared utility libraries, for example, shared authentication, data processing, or including static files such as CSVs or sqlite databases.
Assuming a folder structure as follows:
```bash theme={null}
─── my_agentic_project/
└── tools/
└── multi_file_tool/
└── utils/
└── csv_utils.py
└── __init__.py
└── my_tool.py
└── my_data.csv
└── requirements.txt
```
**my\_tool.py**:
```python PYTHON theme={null}
from ibm_watsonx_orchestrate.agent_builder.tools import tool
from os import path
import pandas as pd
from .utils.csv_utils import parse_csv # this is a relative import of my csv_utils.py file I included in this package
@tool
def return_file_contents() -> str:
"""
Gets the contents of my super important csv file as a table.
Returns:
str: the contents of the csv
"""
base_path = os.path.dirname(os.path.abspath(__file__))
file_path = path.join(base_path, 'my_data.csv')
dataframe: pd.DataFrame = parse_csv(file_path)
return dataframe.to_markdown() # note dataframe output is unsupported, but dataframe.to_markdown will render a table in a format which the ui knows how to render
```
**Importing your multi-file Python tool:**
Assuming your CLI was currently in the `my_agentic_project` folder, this tool could be imported using the following:
```bash BASH theme={null}
orchestrate tools import -k python \
-p tools/multi_file_tool \
-f tools/multi_file_tool/my_tool.py \
-r tools/multi_file_tool/requirements.txt
```
**Notes**:
* Only tools defined in `my_tool.py` will be imported. Other Python files in the package will not be scanned for tools.
* The system will only accept strings composed of alphanumeric characters and underscores (`_`) in the `name` attribute of the `@tool` decorator in `my_tool.py`.
* The system will only accept tool file names composed of alphanumeric characters and underscores (`_`).
* The package root folder and the tool file path CLI arguments MUST share a common base path.
* The path of the tool file folder relative to the package root folder, must be composed of folder names which are only composed of alphanumeric characters and underscores (`_`).
* Any whitespace like characters which prefix or suffix provided package root path will be stripped by the system.
* A package root folder path that resolves to an empty string will make the system assume that no package root was specified. Then, the system falls back to [single Python file tool import](#importing-python-based-tools).
**Limitations:**
* The max compressed tool size: 50Mb
* File resolution for non-python packages must be done relative to the current file, as seen above
* Imports to packages within your code must be resolved relatively
You can create Python tools that accept files or return files to download.
To do that, you must comply with the following requirements:
* To accept files as input, the tool must accept a sequence of bytes as arguments.
* To return a file for download, the tool must return a sequence of bytes as output.
The following example accepts a file as input and returns the processed file for download:
```python Python [expandable] theme={null}
from typing import Union
from io import BytesIO
from typing import Any
from ibm_watsonx_orchestrate.agent_builder.tools import tool
import base64
@tool
def create_image_with_filter(name: str, age: int, image_bytes: bytes) -> bytes:
"""Gets user information, applies a filter to the image, and returns the processed image.
Args:
name (str): The user's name.
age (int): The user's age.
image_bytes (bytes): The original image in bytes format.
Returns:
bytes: The processed image in bytes format.
"""
import cv2
import numpy as np
from typing import Union
from io import BytesIO
# Convert bytes to numpy array
image_array = np.frombuffer(image_bytes, np.uint8)
image = cv2.imdecode(image_array, cv2.IMREAD_COLOR)
if image is None:
raise ValueError("Invalid image bytes provided")
# Apply bilateral filter for smoothing while preserving edges
smooth = cv2.bilateralFilter(image, d=9, sigmaColor=75, sigmaSpace=75)
# Convert to grayscale and detect edges
gray = cv2.cvtColor(image, cv2.COLOR_BGR2GRAY)
edges = cv2.medianBlur(gray, 7)
edges = cv2.adaptiveThreshold(
edges, 255, cv2.ADAPTIVE_THRESH_MEAN_C,
cv2.THRESH_BINARY, blockSize=9, C=2
)
# Convert edges to color image
edges_colored = cv2.cvtColor(edges, cv2.COLOR_GRAY2BGR)
# Combine smoothed image with edges
cartoon = cv2.bitwise_and(smooth, edges_colored)
# Enhance color saturation
hsv = cv2.cvtColor(cartoon, cv2.COLOR_BGR2HSV)
hsv[..., 1] = cv2.multiply(hsv[..., 1], 1.4) # increase saturation
cartoon_enhanced = cv2.cvtColor(hsv, cv2.COLOR_HSV2BGR)
# Convert back to bytes
success, buffer = cv2.imencode('.jpg', cartoon_enhanced)
if not success:
raise RuntimeError("Failed to encode image")
return buffer.tobytes()
```
Use the `WXOFile` parameter type when a tool must reference a file without processing its full content.\
The `WXOFile` class provides methods to retrieve file properties or content as needed.
You can call the following methods:
Returns the filename stored in S3 user metadata.
**Parameters:**
The file URL.
**Returns:**
The file name.
Returns the file size in bytes from S3 user metadata.
**Parameters:**
The file URL.
**Returns:**
The file size in bytes.
Returns the MIME type stored in S3 user metadata.
**Parameters:**
The file URL.
**Returns:**
The file MIME type, such as `image/jpeg` or `text/plain`.
Downloads the file and returns its content.
**Parameters:**
The file URL.
**Returns:**
The file content in bytes.
Use the `MultiFileConstraints` class with `WXOFile` to set limits and validation rules for selecting or uploading multiple files.
It includes these attributes:
Minimum number of files required.
**Default:** 1
Maximum number of files allowed.
**Default:** 100
Max size per file in bytes.
The limit is 30 MB (31,457,280 bytes).
Total size across all files.
The limit is 30 MB (31,457,280 bytes).
If omitted but max\_size\_per\_file is provided, it auto‑computes:
```
max_total_size = min(max_files * max_size_per_file, MAX_FILE_SIZE_LIMIT)
```
Allowed file extensions. For example: `.pdf`, `.png`.
Optional UI text hint.
Use this approach when a tool only needs file metadata or to read the content on demand.\
It helps reduce processing overhead and improves performance.
The method `get_file_metadata(url: str, session_id: str) -> str` is deprecated for single‑file uploads.
```python Python [expandable] theme={null}
from ibm_watsonx_orchestrate.agent_builder.tools import tool, ToolPermission, WXOFile
@tool(permission=ToolPermission.READ_ONLY)
def get_file_metadata(wxo_file: WXOFile, session_id: str) -> str:
"""This tool receives a file reference and a session id and outputs the file's metadata with the session id.
Args:
wxo_file (WXOFile): a file input URL reference
session_id (str): a session ID
Returns:
str: A string containing the file name, size and type with the session ID
"""
filename = WXOFile.get_file_name(wxo_file)
file_size = WXOFile.get_file_size(wxo_file)
file_type = WXOFile.get_file_type(wxo_file)
file_content = WXOFile.get_content(wxo_file) # content in bytes
return f"File name: {filename}, File size: {file_size}, File type: {file_type} for session ID: {session_id}"
```
If you need to import multiple files, you can use the WXOFile parameter type in a list.
```python Python [expandable] theme={null}
from ibm_watsonx_orchestrate.agent_builder.tools import tool, WXOFile, MultiFileConstraints
from typing import List, Annotated
@tool
def file_ingester(wxo_file_input: Annotated[List[WXOFile], MultiFileConstraints(max_files=2, min_files=1, max_size_per_file=5248800, accepted_file_extensions= ["pdf", "docx", "txt"])]) -> dict:
"""This tool checks the sizes of a collection of files
Args:
wxo_file_input (List[WXOFile]): a list of file input URL reference
Returns:
dict[str, str]: A dictionary mapping of file names to their content
"""
content_dict = {}
for file_url in wxo_file_input:
file_name = WXOFile.get_file_name(file_url)
content_bytes = WXOFile.get_content(file_url)
try:
content = content_bytes.decode('utf-8')
except UnicodeDecodeError:
import base64
content = base64.b64encode(content_bytes).decode('utf-8')
key = file_name if file_name else file_url
content_dict[key] = content
return content_dict
```
The native watsonx Orchestrate web chat supports **Markdown rendering**. To ensure correct formatting, the LLM can be instructed to return output in Markdown. In some cases, however, it is more efficient for the tool to return the expected output directly, reducing the amount of transformation required by the LLM.
**Inline tables**
```python PYTHON theme={null}
from ibm_watsonx_orchestrate.agent_builder.tools import tool
import textwrap
@tool
def return_file_contents() -> str:
"""
Renders a markdown table
Returns:
str: the markdown table
"""
return textwrap.dedent('''
| a | b | c |
| -- | -- | -- |
| value1 | value2 | value3 |
| value1 | value2 | value3 |
''')
```
**Links**
```python PYTHON theme={null}
from ibm_watsonx_orchestrate.agent_builder.tools import tool
@tool
def return_link() -> str:
"""
Renders a link
Returns:
str: the link
"""
return 'Navigate to [IBM.com](http://ibm.com)'
```
**Images**
```python PYTHON theme={null}
from ibm_watsonx_orchestrate.agent_builder.tools import tool
@tool
def return_image() -> str:
"""
Renders an image
Returns:
str: the image
"""
return 'Check out this image\n '
```
If your agent has access to context variables, provided either by the default context or by passing context with the request, you can use these variables within your Python tool.
To do this you will need to pass an `AgentRun` object parameter to the Python tool:
**Get context variables:**
```python Python [expandable] theme={null}
from ibm_watsonx_orchestrate.agent_builder.tools import tool
from ibm_watsonx_orchestrate.run.context import AgentRun
@tool
def context_example(context : AgentRun) -> str:
"""
Retrieves the user's email.
Args:
context (AgentRun): The agent run context containing request metadata.
Returns:
str: A formatted string displaying the user's email.
"""
req_context = context.request_context
user_email = req_context.get('wxo_email_id')
return f"Context Data: {user_email}"
```
**Update context variables:**
```python Python [expandable] theme={null}
from ibm_watsonx_orchestrate.agent_builder.tools import tool
from ibm_watsonx_orchestrate.run.context import AgentRun
@tool
def update_user_context(context: AgentRun, user_age: int, user_login: str, user_password: str) -> str:
"""
Demonstrates two ways to set context variables:
- Set user_age individually via item assignment (single key).
- Set user_login and user_password together via update() (bulk).
Args:
context (AgentRun): The agent run context containing request metadata.
user_age (int): The user's age to store.
user_login (str): The user's login identifier.
user_password (str): The user's password.
Returns:
str: Confirmation with the updated values.
"""
req_context = context.request_context
# --- Single-key assignment (ideal for one value)
req_context["user_age"] = user_age
# --- Bulk update for multiple related keys
req_context.update({
"user_login": user_login,
"user_password": user_password,
})
# Read back to confirm
age = req_context.get("user_age")
login = req_context.get("user_login")
password = req_context.get("user_password")
return (
"Context updated -> "
f"user_age: {age}, "
f"user_login: {login}, "
f"user_password: {password}"
)
```
**Note:**
* A tool can only have one `AgentRun` parameter, a tools with more than one will fail to import. For more information about providing context to agents, see [Providing access to context variables](/agents/build_agent#providing-access-to-context-variables)
* You cannot update the default context variables offered by watsonx Orchestrate.
* **Context persistence:** Updated context variables are only available within a single run invocation. They are not persisted across chat sessions or threads. If multiple tools are called during the same run, all tools will receive the updated context. For subsequent runs, you must explicitly pass the updated context from the previous run to maintain state.
In integration-heavy environments, schemas change frequently. Dynamic input and output schemas enable **select fields** in a tool's input to be mutable at runtime—securely and predictably—without affecting immutable core fields.
Use dynamic it when:
* You need to add new attributes to objects (e.g., CRM records).
* You need a small number of user-defined fields beyond a stable core API.
* You want Builder UI users to change types (e.g., string → number) for dynamic fields only.
Avoid it when:
* All fields are stable and tightly coupled to a known data model.
* You need complex nested modifications (Phase 1 supports flat properties only in most scenarios).
```python Python theme={null}
from ibm_watsonx_orchestrate.agent_builder.tools import tool
@tool(
enable_dynamic_input_schema=True, # if false, dynamic_input_schema is ignored
dynamic_input_schema={ # this is the schema of the kwargs
'type': 'object',
'properties': {
'c': {'type': 'integer', 'description': 'The third integer to add'}
},
'required': []
},
dynamic_output_schema={ # this is the schema of the kwargs
'type': 'object',
'properties': {
'sum': {'type': 'integer', 'description': 'The sum of a, b and c'},
'c': {'type': 'string', 'description': 'The third integer to add'}
},
'required': []
}
)
def add_kwargs(a: int, b: int, **kwargs) -> dict:
"""
Receive required three inputs as a, b, c.
Adds them and returns the result.
Args:
a (int): The first integer to add.
b (int): The second integer to add.
Returns:
int: The sum of `a` and `b`.
Example:
>>> add_two_numbers(3, 5)
8
"""
sum = a + b + kwargs.get("c", 0)
return {'sum': sum, 'c': kwargs.get("c", 0)}
if __name__ == "__main__":
print(add_kwargs(1, 2, c=3))
```
```python Python theme={null}
from ibm_watsonx_orchestrate.agent_builder.tools import tool
@tool(
enable_dynamic_input_schema=True, # if false, dynamic_input_schema is ignored
dynamic_input_schema={ # this is the schema of the kwargs
'type': 'object',
'properties': {
'c': {'type': 'string', 'description': 'The third word'}
},
'required': []
},
dynamic_output_schema={ # this is the schema of the kwargs
'type': 'object',
'properties': {
'message': {'type': 'string', 'description': 'The message that combines a, b and c'},
'c': {'type': 'string', 'description': 'The third word'}
},
'required': []
}
)
def combine_words(a: str, b: str, **kwargs) -> dict:
"""
Receive required three inputs as a, b, c.
Combine them and returns the result.
Args:
a (string): The first word.
b (string): The second word.
Returns:
message: The message combines `a` and `b`.
Example:
>>> combine_words("hello", "world")
"helloworld"
"""
message = a + b + kwargs.get("c", "")
return {'message': message, 'c': kwargs.get("c", "")}
if __name__ == "__main__":
print(combine_words("hello", "world", c="Hana"))
```
Create tools that trigger citation generation so Agents provide source references in their responses. Use the `ToolResponseFormat.CONTENT_AND_ARTIFACT` response format and return both the main content and an artifact that contains citation data.
**Example:**
```python Python theme={null}
from ibm_watsonx_orchestrate.agent_builder.tools import tool, ToolResponseFormat
@tool(response_format=ToolResponseFormat.CONTENT_AND_ARTIFACT)
def search(query):
"""Searches for information and returns results with citations.
Args:
query (str): The search query.
Returns:
tuple: A tuple containing (content, artifact) where artifact includes search results and citation information.
"""
content = "some content"
artifact = {
"search_results": [
{"title": "some title", "body": "some text"}
],
"citations_shown": -1
}
return content, artifact
```
**Artifact attributes:**
A list of search result objects that support citation creation. Each object includes:
* **title** (string): Title of the source.
* **body** (string): Content or excerpt from the source.
Controls how many citations to display.
* Use **-1** to show every citation (default).
* Use **0** or a positive number to limit the count.
This feature is a preview feature. There are some known bugs which will be resolved in upcoming releases.
Create a tool that returns a form with interactive widgets to collect structured input from users. Define the form by using `FormWidget` and input components such as `TextInput` and `DatePicker`. Return the form through a `ToolResult` so it renders in the user interface.
For more information, see [Tool response and annotations](tool_response_structure).
```python PYTHON theme={null}
from ibm_watsonx_orchestrate.agent_builder.tools import tool
from ibm_watsonx_orchestrate.run.widgets.forms.types import (
FormWidget, TextInput, TextArea, RadioButton, Checkbox,
ComboBox, NumberInput, DatePicker, DateRangePicker,
FileUpload, Table, TableHeader
)
from ibm_watsonx_orchestrate.run.tool_result import ToolResult, TextContent, Annotations, Role
@tool(
name="simple_test_form",
description="Show a simple test form"
)
def simple_test_form():
"""
Returns a minimal form widget.
"""
form = FormWidget(
title="Simple Test Form",
description="A minimal test form",
inputs=[
TextInput(
name="name",
title="Name",
placeholder="Enter your name",
required=True
),
TextInput(
name="email",
title="Email",
placeholder="Enter your email",
required=True
),
DatePicker(
name="date",
title="Date",
required=False
)
]
)
tool_result = ToolResult(
content=[
TextContent(
text="Please fill out this simple test form.",
annotations=Annotations(audience=[Role.USER])
)
],
widget=form
)
return tool_result
```
Use to gather basic textual information such as names and emails.
 ```python theme={null}
TextInput(
name="first_name",
title="First Name",
placeholder="Enter Your First Name...",
description="Your full legal name as it appears on your passport or government issued ID",
required=True
)
```
Unique identifier for the field in the form
Label rendered beside the input in the UI
Require the field to be set before allowing user to submit the form.
Information text to give users more clairty about what should be provided in the form.
Placeholder text rendered inside the form field
Default value of the field input
Use to gather long textual information.
```python theme={null}
TextInput(
name="first_name",
title="First Name",
placeholder="Enter Your First Name...",
description="Your full legal name as it appears on your passport or government issued ID",
required=True
)
```
Unique identifier for the field in the form
Label rendered beside the input in the UI
Require the field to be set before allowing user to submit the form.
Information text to give users more clairty about what should be provided in the form.
Placeholder text rendered inside the form field
Default value of the field input
Use to gather long textual information.
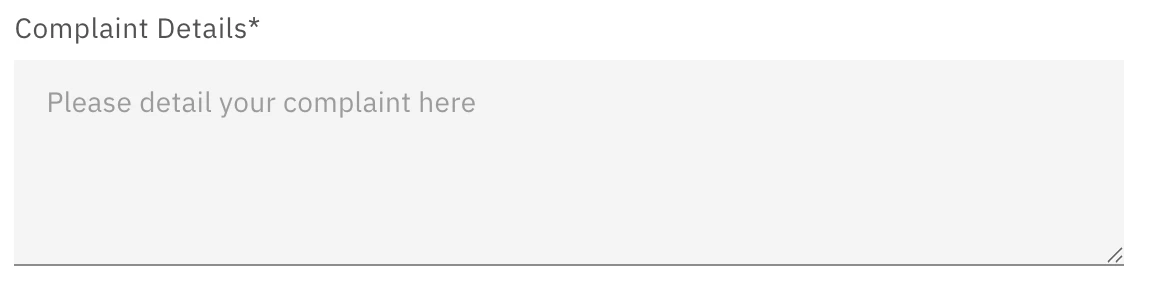 ```python theme={null}
TextArea(
name="complaint",
title="Complaint Details",
placeholder="Please detail your complaint here",
required=True
)
```
Unique identifier for the field in the form
Label rendered beside the input in the UI
Require the field to be set before allowing user to submit the form.
Information text to give users more clairty about what should be provided in the form.
Placeholder text rendered inside the form field
Default value of the field input
Should the field be automatically selected when the form loads
Use to gather a singular choice from a user.
```python theme={null}
TextArea(
name="complaint",
title="Complaint Details",
placeholder="Please detail your complaint here",
required=True
)
```
Unique identifier for the field in the form
Label rendered beside the input in the UI
Require the field to be set before allowing user to submit the form.
Information text to give users more clairty about what should be provided in the form.
Placeholder text rendered inside the form field
Default value of the field input
Should the field be automatically selected when the form loads
Use to gather a singular choice from a user.
 ```python theme={null}
RadioButton(
name="title",
title="Title",
description="Your preferred prefix title for your name.",
required=True,
options=["mr", "ms", "mrs", "dr", "n/a"],
option_labels=["MR", "MS", "MRS", "DR", "Prefer not to say"]
)
```
Unique identifier for the field in the form
Label rendered beside the input in the UI
Require the field to be set before allowing user to submit the form.
Information text to give users more clairty about what should be provided in the form.
Default value of the field input
List of internal values for the users's choice
User friendly names for each user choice
Use to gather boolean choices from the user.
```python theme={null}
RadioButton(
name="title",
title="Title",
description="Your preferred prefix title for your name.",
required=True,
options=["mr", "ms", "mrs", "dr", "n/a"],
option_labels=["MR", "MS", "MRS", "DR", "Prefer not to say"]
)
```
Unique identifier for the field in the form
Label rendered beside the input in the UI
Require the field to be set before allowing user to submit the form.
Information text to give users more clairty about what should be provided in the form.
Default value of the field input
List of internal values for the users's choice
User friendly names for each user choice
Use to gather boolean choices from the user.
 ```python theme={null}
Checkbox(
name="marketting_signup",
title="Would you like to recieve marketting emails",
default_value=False
)
```
Unique identifier for the field in the form
Label rendered beside the input in the UI
Require the field to be set before allowing user to submit the form.
Information text to give users more clairty about what should be provided in the form.
Default value of the field input
Dropdown field used for gathering a single user choice
```python theme={null}
Checkbox(
name="marketting_signup",
title="Would you like to recieve marketting emails",
default_value=False
)
```
Unique identifier for the field in the form
Label rendered beside the input in the UI
Require the field to be set before allowing user to submit the form.
Information text to give users more clairty about what should be provided in the form.
Default value of the field input
Dropdown field used for gathering a single user choice
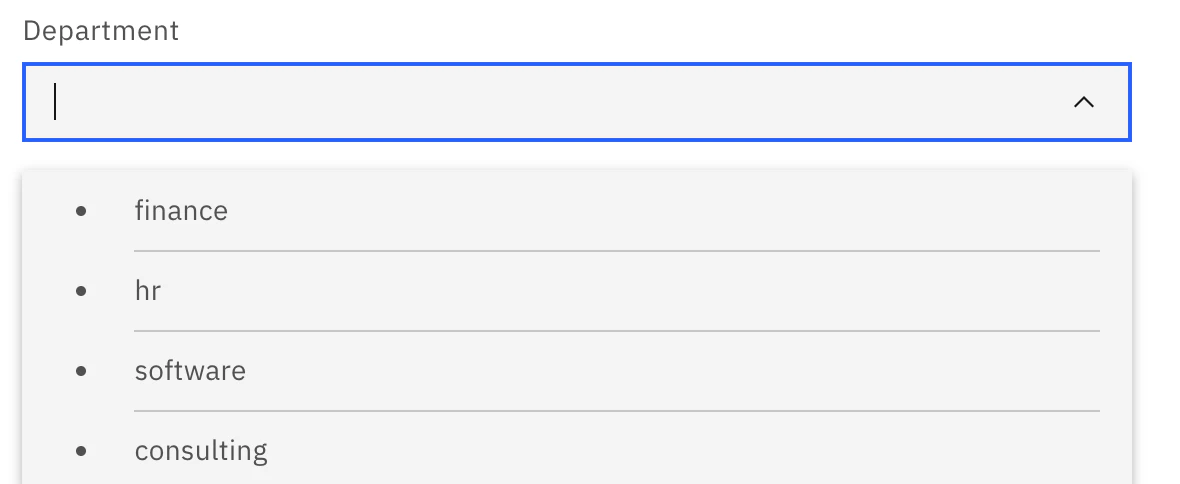 ```python theme={null}
ComboBox(
name="department",
title="Department",
options=["finance", "hr", "software", "consulting"],
option_labels=["Finance", "HR", "Software", "Consulting"]
)
```
Unique identifier for the field in the form
Label rendered beside the input in the UI
Require the field to be set before allowing user to submit the form.
Information text to give users more clairty about what should be provided in the form.
Placeholder text rendered inside the form field
Default value of the field input
List of internal values for the users's choice
User friendly names for each user choice
Use to gather numberical data from a user.
```python theme={null}
ComboBox(
name="department",
title="Department",
options=["finance", "hr", "software", "consulting"],
option_labels=["Finance", "HR", "Software", "Consulting"]
)
```
Unique identifier for the field in the form
Label rendered beside the input in the UI
Require the field to be set before allowing user to submit the form.
Information text to give users more clairty about what should be provided in the form.
Placeholder text rendered inside the form field
Default value of the field input
List of internal values for the users's choice
User friendly names for each user choice
Use to gather numberical data from a user.
 ```python theme={null}
NumberInput(
name="quantity",
title="Quantity",
required=True,
default_value=0,
minimum=0,
maximum=10
)
```
Unique identifier for the field in the form
Label rendered beside the input in the UI
Require the field to be set before allowing user to submit the form.
Information text to give users more clairty about what should be provided in the form.
Default value of the field input
Minimum value allowed in the field
Maximum value allowed in the field
Value must be a multiple of this setting. (e.g. `multiple_of=5` (5, 10, 15 ...))
Use to gather an individual date from a user.
```python theme={null}
NumberInput(
name="quantity",
title="Quantity",
required=True,
default_value=0,
minimum=0,
maximum=10
)
```
Unique identifier for the field in the form
Label rendered beside the input in the UI
Require the field to be set before allowing user to submit the form.
Information text to give users more clairty about what should be provided in the form.
Default value of the field input
Minimum value allowed in the field
Maximum value allowed in the field
Value must be a multiple of this setting. (e.g. `multiple_of=5` (5, 10, 15 ...))
Use to gather an individual date from a user.
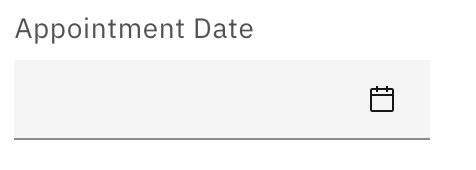 ```python theme={null}
DatePicker(
name="appointment_date",
title="Appointment Date",
date_format="DD-MM-YYYY"
)
```
Unique identifier for the field in the form
Label rendered beside the input in the UI
Require the field to be set before allowing user to submit the form.
Information text to give users more clairty about what should be provided in the form.
Default value of the field input
Format to display the date in
Use to gather a start and end date from a user.
```python theme={null}
DatePicker(
name="appointment_date",
title="Appointment Date",
date_format="DD-MM-YYYY"
)
```
Unique identifier for the field in the form
Label rendered beside the input in the UI
Require the field to be set before allowing user to submit the form.
Information text to give users more clairty about what should be provided in the form.
Default value of the field input
Format to display the date in
Use to gather a start and end date from a user.
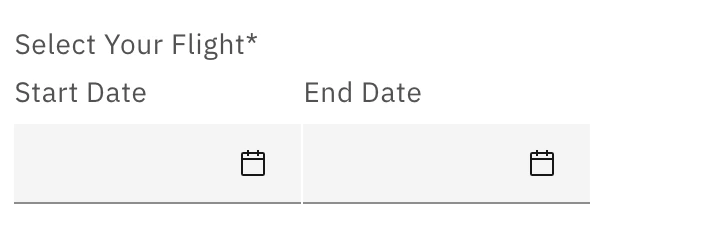 ```python theme={null}
DateRangePicker(
name="flight_date",
title="Select Your Flight",
date_format="DD-MM-YYYY",
required=True,
)
```
Unique identifier for the field in the form
Label rendered beside the input in the UI
Require the field to be set before allowing user to submit the form.
Information text to give users more clairty about what should be provided in the form.
Placeholder text rendered inside the form field
Format to display the date in
Placeholder text rendered inside the form field
Label for the start date selection field
Label for the end date selection field
Default value for the start date selection field
Default value for the end date selection field
Use to gather file or files from a user.
```python theme={null}
DateRangePicker(
name="flight_date",
title="Select Your Flight",
date_format="DD-MM-YYYY",
required=True,
)
```
Unique identifier for the field in the form
Label rendered beside the input in the UI
Require the field to be set before allowing user to submit the form.
Information text to give users more clairty about what should be provided in the form.
Placeholder text rendered inside the form field
Format to display the date in
Placeholder text rendered inside the form field
Label for the start date selection field
Label for the end date selection field
Default value for the start date selection field
Default value for the end date selection field
Use to gather file or files from a user.
 ```python theme={null}
FileUpload(
name="receipts",
title="Receipts",
upload_button_label="Click Here",
multi=True
)
```
Unique identifier for the field in the form
Label rendered beside the input in the UI
Require the field to be set before allowing user to submit the form.
Information text to give users more clairty about what should be provided in the form.
Custom text to be displayed on the upload button
The maximum allowed file size
List of allowed file types that users can select
Should the user be able to select multiple files for upload
The maximum amount of files a user should be able to upload
The minimum amount of files a user should be able to upload
A list of dictionaries with `fileName` and `url` set for default uploaded files.
Clickable button that downloads a file
```python theme={null}
FileUpload(
name="receipts",
title="Receipts",
upload_button_label="Click Here",
multi=True
)
```
Unique identifier for the field in the form
Label rendered beside the input in the UI
Require the field to be set before allowing user to submit the form.
Information text to give users more clairty about what should be provided in the form.
Custom text to be displayed on the upload button
The maximum allowed file size
List of allowed file types that users can select
Should the user be able to select multiple files for upload
The maximum amount of files a user should be able to upload
The minimum amount of files a user should be able to upload
A list of dictionaries with `fileName` and `url` set for default uploaded files.
Clickable button that downloads a file
 ```python theme={null}
FileDownload(
name="documentation",
title="Documentation",
file_id="docs_file",
file_name="About Us",
file_url="https://www./about_us.pdf"
)
```
Unique identifier for the field in the form
Label rendered beside the input in the UI
Information text to give users more clairty about what should be provided in the form.
Unique identifier for the file
Name of the file
URL of the file
* Use the same ADK version when importing tools to ensure compatibility.
* Reuse a common `requirements.txt` across multiple tools to reduce repeated virtual-environment setup.
* If tools require conflicting package versions, maintain separate `requirements.txt` files and environments.
## Runtime and migration strategy
Python tools execute within a **[UV virtual environment](https://docs.astral.sh/uv/)** inside a component called the **tools runtime**. This runtime includes a predefined set of supported Python versions. Currently, the only supported version is **Python 3.12**.
### Version Management
* When a tool is imported into the runtime, it uses the Python version it was originally imported with.
* If that version becomes deprecated by watsonx Orchestrate, the system will:
* Display a **deprecation warning** in the UI.
* Show the same warning when running the command:
```bash BASH theme={null}
orchestrate tools list
```
* Inform the user that the tool must be reimported to remain compatible.
### Deprecation Timeline
* After **24 months** of deprecation:
* The runtime will remove support for the deprecated Python version.
* If the tool has not been reimported, the runtime will attempt to reimport it using the closest supported Python version.
## Limitations of Python tools
### Host networking
* **watsonx Orchestrate Developer Edition**: Python tools run inside a container. In this environment, `localhost` refers to the container itself, not the host machine. To call an endpoint on the host machine, use `docker.host.internal` or the host machine's IP address.
* **SaaS**: The SaaS version of watsonx Orchestrate cannot access your company's internal network. If internal access is required, prototype with the Developer Edition and then deploy watsonx Orchestrate on premises or consult IBM for alternative solutions.
* **On premises**: To allow a tool to access external internet resources, ensure that firewall rules do not block outbound traffic from the node pool responsible for tool execution.
### Read only filesystem
For security and stability, tools execute in a **read-only filesystem**. Each tool can access only its own filesystem and cannot modify files during execution.
```python theme={null}
FileDownload(
name="documentation",
title="Documentation",
file_id="docs_file",
file_name="About Us",
file_url="https://www./about_us.pdf"
)
```
Unique identifier for the field in the form
Label rendered beside the input in the UI
Information text to give users more clairty about what should be provided in the form.
Unique identifier for the file
Name of the file
URL of the file
* Use the same ADK version when importing tools to ensure compatibility.
* Reuse a common `requirements.txt` across multiple tools to reduce repeated virtual-environment setup.
* If tools require conflicting package versions, maintain separate `requirements.txt` files and environments.
## Runtime and migration strategy
Python tools execute within a **[UV virtual environment](https://docs.astral.sh/uv/)** inside a component called the **tools runtime**. This runtime includes a predefined set of supported Python versions. Currently, the only supported version is **Python 3.12**.
### Version Management
* When a tool is imported into the runtime, it uses the Python version it was originally imported with.
* If that version becomes deprecated by watsonx Orchestrate, the system will:
* Display a **deprecation warning** in the UI.
* Show the same warning when running the command:
```bash BASH theme={null}
orchestrate tools list
```
* Inform the user that the tool must be reimported to remain compatible.
### Deprecation Timeline
* After **24 months** of deprecation:
* The runtime will remove support for the deprecated Python version.
* If the tool has not been reimported, the runtime will attempt to reimport it using the closest supported Python version.
## Limitations of Python tools
### Host networking
* **watsonx Orchestrate Developer Edition**: Python tools run inside a container. In this environment, `localhost` refers to the container itself, not the host machine. To call an endpoint on the host machine, use `docker.host.internal` or the host machine's IP address.
* **SaaS**: The SaaS version of watsonx Orchestrate cannot access your company's internal network. If internal access is required, prototype with the Developer Edition and then deploy watsonx Orchestrate on premises or consult IBM for alternative solutions.
* **On premises**: To allow a tool to access external internet resources, ensure that firewall rules do not block outbound traffic from the node pool responsible for tool execution.
### Read only filesystem
For security and stability, tools execute in a **read-only filesystem**. Each tool can access only its own filesystem and cannot modify files during execution.