> ## Documentation Index
> Fetch the complete documentation index at: https://developer.watson-orchestrate.ibm.com/llms.txt
> Use this file to discover all available pages before exploring further.
# Installing watsonx Orchestrate Developer Edition
You can install or uninstall watsonx Orchestrate Developer Edition using ADK CLI commands. To get started, make sure Docker Engine is installed and the .env file is properly configured.
```mermaid theme={null}
graph LR
Container[Configure Docker Engine] --> ENV[Configure .env file]
ENV --> Server[Install or uninstall Developer Edition]
```
## Installation prerequisites
Before installing watsonx Orchestrate Developer Edition, make sure you meet the following requirements:
Your computer needs to meet the following requirements:
| Component | Minimum | Recommended |
| --------- | ------- | ----------- |
| CPU | 8-core | 8-core |
| RAM | 16 GB | 32 GB |
You must have access to at least one of the following services:
* watsonx Orchestrate
* watsonx.ai
You need a valid license for watsonx Orchestrate Developer Edition. You can obtain a license by:
* Purchasing a SaaS license for watsonx Orchestrate
* Contacting IBM Sales for a direct purchase
## Configuring container manager
You install and uninstall watsonx Orchestrate Developer Edition automatically using ADK CLI commands. Since the installation runs inside a Docker container, you need to have Docker Engine and Docker Compose installed on your machine.
You can install Docker Engine and Docker Compose natively on systems that offer official support. Alternatively, for systems without native support, you can use container managers such as Rancher or Colima to install and configure them.
Click the tabs below to learn how to install and configure Docker Engine and Docker Compose based on your operating system.
macOS doesn’t officially support Docker Engine or Docker Compose. To install and run them, use a container manager like Rancher or Colima.
* To install Docker Engine and Docker Compose using Rancher, see see [Rancher Desktop for macOS](https://docs.rancherdesktop.io/getting-started/installation/#macos).
* Then, configure Rancher using the settings described in [Rancher settings](https://github.com/IBM/ibm-watsonx-orchestrate-adk/blob/main/_docs/recommended-docker-settings/rancher-settings.md).
If you use Apple Silicon hardware with Rancher Desktop, enable Rosetta support to use the Apple Virtualization (VZ) framework.
* To install Docker Engine and Docker Compose using Colima, see [Colima](https://github.com/abiosoft/colima?tab=readme-ov-file#installation).
* Then, configure Colima using the settings described in [Colima settings](https://github.com/IBM/ibm-watsonx-orchestrate-adk/blob/main/_docs/recommended-docker-settings/coilma-settings.md).
On Windows, you can install Docker Engine and Docker Compose using Windows Subsystem for Linux (WSL). Alternatively, you can use a container manager like Rancher to simplify setup and manage containers more efficiently.
* To install Docker Engine and Docker Compose using Rancher, see [Rancher Desktop for Windows](https://docs.rancherdesktop.io/getting-started/installation/#windows).
* To install Docker Engine and Docker Compose using WSL, see:
1. [How to install Linux on Windows with WSL](https://learn.microsoft.com/en-us/windows/wsl/install)
2. [Install Docker Engine](https://docs.docker.com/engine/install/)
3. [Overview of installing Docker Compose](https://docs.docker.com/compose/install/)
**Note:**
* WSL 2 with Ubuntu distribution is recommended.
* Install [Docker Compose v2](https://docs.docker.com/compose/releases/migrate/). The ADK is not compatible with Compose v1.
* To ensure better integration and performance, install the ADK inside your WSL environment, as your server will be running there. Once installed, you can build and manage your agents directly within WSL for a smoother development experience.
Linux-based systems officially support Docker Engine and Docker Compose, so you can install them directly. If you prefer, you can use a container manager such as Rancher or Colima to help set up and manage your container environment.
* To install Docker Engine and Docker Compose using Rancher, see [Rancher Desktop for Linux](https://docs.rancherdesktop.io/getting-started/installation/#linux).
* To install Docker Engine and Docker Compose using Colima, see [Colima](https://github.com/abiosoft/colima?tab=readme-ov-file#installation).
* To install Docker Engine and Docker Compose directly, see:
1. [Install Docker Engine](https://docs.docker.com/engine/install/)
2. [Overview of installing Docker Compose](https://docs.docker.com/compose/install/)
**Note:**
Install [Docker Compose v2](https://docs.docker.com/compose/releases/migrate/). The ADK is not compatible with Compose v1.
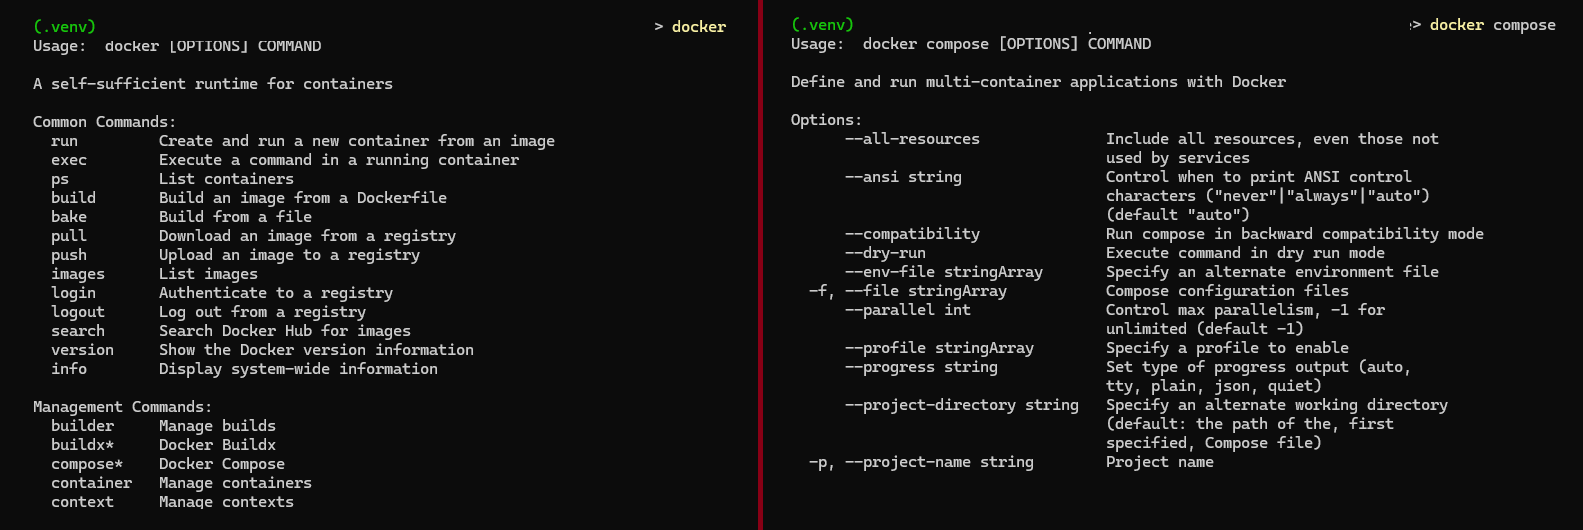
After you install Docker Engine and Docker Compose, open your terminal, Command Prompt (CMD), or PowerShell and run the `docker` and `docker compose` commands. These commands display a list of available options and subcommands that you can use to interact with Docker.
The image below shows an example of the output returned by these commands.
 ## Configuring .env file
The `.env` file is a plain text file that stores environment variables. The ADK uses the variables you define in this file to authenticate your user and install watsonx Orchestrate Developer Edition.
The variables you need to configure depend on the authentication method you choose. You can authenticate using one of the following methods:
* **watsonx Orchestrate account**
Use this method if you have a watsonx Orchestrate account or if you're using a 30-day trial.
* **myIBM**
Use this method if you purchased a watsonx Orchestrate Developer Edition license through sales or if you're using an on-premises version.
* **Custom Image Registry**
Use this method if you’ve already copied the required Docker images to an image registry. For example, an Artifactory repository.
Click the tabs below to view instructions for configuring the `.env` file based on your authentication method.
To authenteticate using watsonx Orchestrate account:
Create a file named `.env`.
Add the following variables to your `.env` file:
The source ID for the watsonx Orchestrate Developer Edition. Set `orchestrate`.
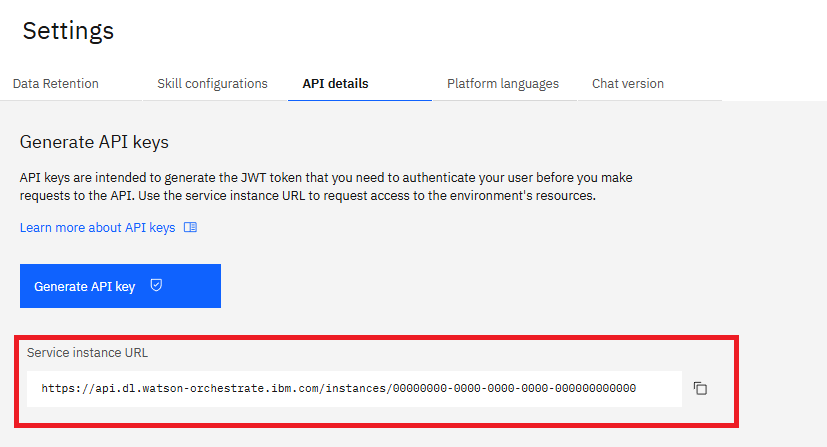
The watsonx Orchestrate service instance URL.
To obtain the service instance URL, follow these steps:
1. [Log in](https://www.ibm.com/docs/en/watsonx/watson-orchestrate/current?topic=orchestrate-logging-in-watsonx) to your watsonx Orchestrate account.
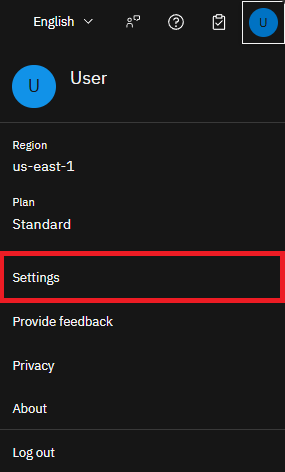
2. Click your user profile and open the **Settings** page.
## Configuring .env file
The `.env` file is a plain text file that stores environment variables. The ADK uses the variables you define in this file to authenticate your user and install watsonx Orchestrate Developer Edition.
The variables you need to configure depend on the authentication method you choose. You can authenticate using one of the following methods:
* **watsonx Orchestrate account**
Use this method if you have a watsonx Orchestrate account or if you're using a 30-day trial.
* **myIBM**
Use this method if you purchased a watsonx Orchestrate Developer Edition license through sales or if you're using an on-premises version.
* **Custom Image Registry**
Use this method if you’ve already copied the required Docker images to an image registry. For example, an Artifactory repository.
Click the tabs below to view instructions for configuring the `.env` file based on your authentication method.
To authenteticate using watsonx Orchestrate account:
Create a file named `.env`.
Add the following variables to your `.env` file:
The source ID for the watsonx Orchestrate Developer Edition. Set `orchestrate`.
The watsonx Orchestrate service instance URL.
To obtain the service instance URL, follow these steps:
1. [Log in](https://www.ibm.com/docs/en/watsonx/watson-orchestrate/current?topic=orchestrate-logging-in-watsonx) to your watsonx Orchestrate account.
2. Click your user profile and open the **Settings** page.
 3. Open the **API details** tab.
4. Copy your service instance URL.
3. Open the **API details** tab.
4. Copy your service instance URL.
 The watsonx Orchestrate API key.
To obtain the API key, follow these steps:
1. [Log in](https://www.ibm.com/docs/en/watsonx/watson-orchestrate/current?topic=orchestrate-logging-in-watsonx) to your watsonx Orchestrate account.
2. Click your user profile and open the **Settings** page.
3. Open the **API details** tab.
4. Click **Generate API key**.
The watsonx Orchestrate API key.
To obtain the API key, follow these steps:
1. [Log in](https://www.ibm.com/docs/en/watsonx/watson-orchestrate/current?topic=orchestrate-logging-in-watsonx) to your watsonx Orchestrate account.
2. Click your user profile and open the **Settings** page.
3. Open the **API details** tab.
4. Click **Generate API key**.
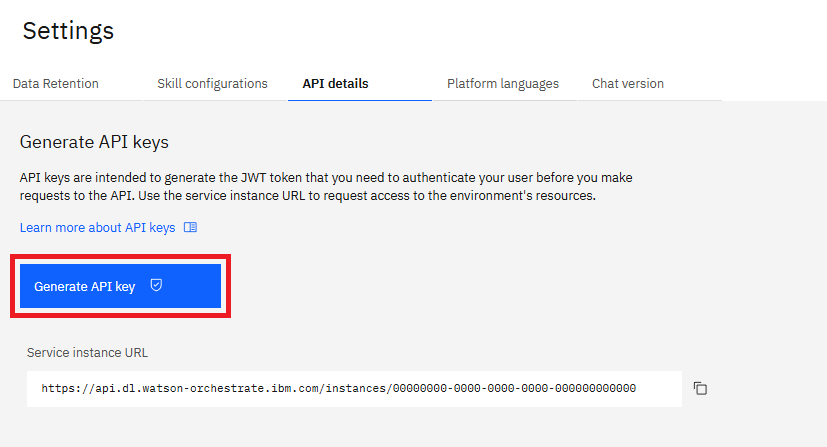 Your API key is unique and can't be edited or deleted in the settings page. You must save the API key in a safe location.
```txt .env theme={null}
WO_DEVELOPER_EDITION_SOURCE=orchestrate
WO_INSTANCE=
WO_API_KEY=
```
If you're using an on-premises setup, you also need to set the following environment variables:
Boolean environment variable that controls whether image layers are pulled in parallel. Defaults to `true`.
Treated as `false` if `DOCKER_IMAGE_PULL_PARALLEL_WORKERS_COUNT` is set to `1`.
Integer value that defines how many Docker image layers are pulled in parallel. Accepts values from `1` to `10`.
Values outside this range trigger a fallback to the default value. Defaults to `7`.
Boolean environment variable that enables ranged requests when pulling large layers. Defaults to `true`.
**Note:**
Only takes effect when `DOCKER_IMAGE_PULL_LAYERS_PARALLELISM` is enabled.
For on-premises (CPD) deployments, ADK uses SSL authentication by default to connect to a registry proxy in your watsonx Orchestrate on-premises environment. You can control this behavior by setting the WO\_VERIFY\_SSL environment variable. Use this variable to enable or disable SSL authentication.
To enable SSL security using the system’s default SSL certificate, set the `WO_VERIFY_SSL` environment variable to `True`:
```txt .env theme={null}
WO_VERIFY_SSL=True
```
To use a custom SSL certificate, set the `WO_VERIFY_SSL` variable to the path of your certificate:
```txt .env theme={null}
WO_VERIFY_SSL=
```
To disable SSL authentication, set the `WO_VERIFY_SSL` environment variable to `False`:
```txt .env theme={null}
WO_VERIFY_SSL=False
```
```txt .env theme={null}
DOCKER_IMAGE_PULL_LAYERS_PARALLELISM=true
DOCKER_IMAGE_PULL_PARALLEL_WORKERS_COUNT=7
USE_RANGE_REQUESTS_IN_DOCKER_IMAGE_PULLS=true
WO_VERIFY_SSL=True
```
Additionally, if you operate in a region other than us-south, configure the region variables. Set the following variables:
The assistant LMM API endpoint for your region
The assistant embedding API endpoint for your region.
The routing LLM API endpoint for your region.
The watsonx endpoint for your region.
```txt .env theme={null}
ASSISTANT_LLM_API_BASE=https://.ml.cloud.ibm.com/
ASSISTANT_EMBEDDINGS_API_BASE=https://.ml.cloud.ibm.com/
ROUTING_LLM_API_BASE=https://.ml.cloud.ibm.com/
WATSONX_URL=https://.ml.cloud.ibm.com/
```
**Where:**
* ``: refers to the region code for your location. For example: `eu-de`
To authenteticate using myIBM:
Create a file named `.env`.
Add the following variables to your `.env` file:
The source ID for the watsonx Orchestrate Developer Edition. Set `myibm`.
An entitlement key from a valid watsonx.ai instance.
To obtain the entitlement key, follow these steps:
1. Access [My IBM](https://myibm.ibm.com/).
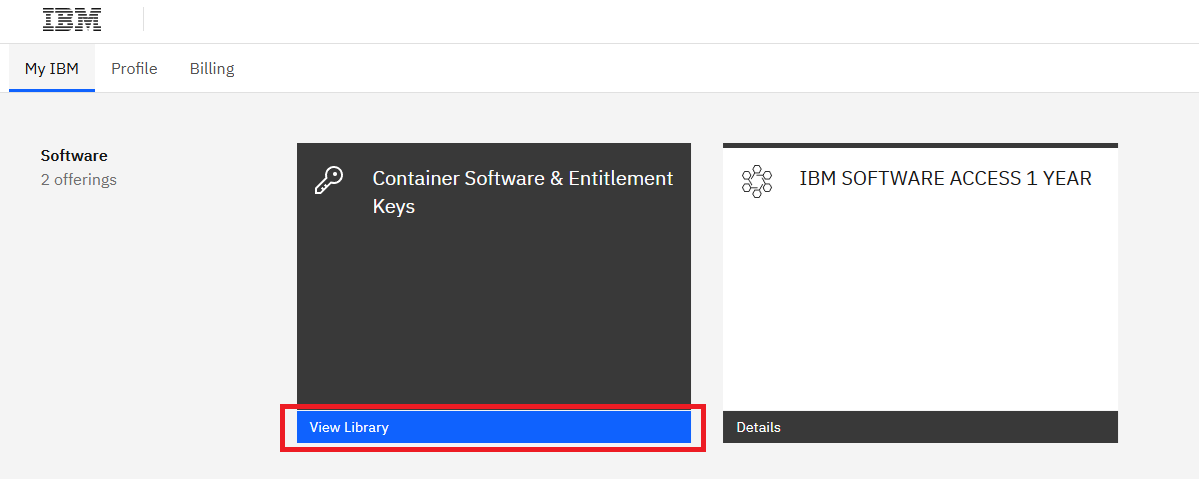
2. Click **View Library**.
Your API key is unique and can't be edited or deleted in the settings page. You must save the API key in a safe location.
```txt .env theme={null}
WO_DEVELOPER_EDITION_SOURCE=orchestrate
WO_INSTANCE=
WO_API_KEY=
```
If you're using an on-premises setup, you also need to set the following environment variables:
Boolean environment variable that controls whether image layers are pulled in parallel. Defaults to `true`.
Treated as `false` if `DOCKER_IMAGE_PULL_PARALLEL_WORKERS_COUNT` is set to `1`.
Integer value that defines how many Docker image layers are pulled in parallel. Accepts values from `1` to `10`.
Values outside this range trigger a fallback to the default value. Defaults to `7`.
Boolean environment variable that enables ranged requests when pulling large layers. Defaults to `true`.
**Note:**
Only takes effect when `DOCKER_IMAGE_PULL_LAYERS_PARALLELISM` is enabled.
For on-premises (CPD) deployments, ADK uses SSL authentication by default to connect to a registry proxy in your watsonx Orchestrate on-premises environment. You can control this behavior by setting the WO\_VERIFY\_SSL environment variable. Use this variable to enable or disable SSL authentication.
To enable SSL security using the system’s default SSL certificate, set the `WO_VERIFY_SSL` environment variable to `True`:
```txt .env theme={null}
WO_VERIFY_SSL=True
```
To use a custom SSL certificate, set the `WO_VERIFY_SSL` variable to the path of your certificate:
```txt .env theme={null}
WO_VERIFY_SSL=
```
To disable SSL authentication, set the `WO_VERIFY_SSL` environment variable to `False`:
```txt .env theme={null}
WO_VERIFY_SSL=False
```
```txt .env theme={null}
DOCKER_IMAGE_PULL_LAYERS_PARALLELISM=true
DOCKER_IMAGE_PULL_PARALLEL_WORKERS_COUNT=7
USE_RANGE_REQUESTS_IN_DOCKER_IMAGE_PULLS=true
WO_VERIFY_SSL=True
```
Additionally, if you operate in a region other than us-south, configure the region variables. Set the following variables:
The assistant LMM API endpoint for your region
The assistant embedding API endpoint for your region.
The routing LLM API endpoint for your region.
The watsonx endpoint for your region.
```txt .env theme={null}
ASSISTANT_LLM_API_BASE=https://.ml.cloud.ibm.com/
ASSISTANT_EMBEDDINGS_API_BASE=https://.ml.cloud.ibm.com/
ROUTING_LLM_API_BASE=https://.ml.cloud.ibm.com/
WATSONX_URL=https://.ml.cloud.ibm.com/
```
**Where:**
* ``: refers to the region code for your location. For example: `eu-de`
To authenteticate using myIBM:
Create a file named `.env`.
Add the following variables to your `.env` file:
The source ID for the watsonx Orchestrate Developer Edition. Set `myibm`.
An entitlement key from a valid watsonx.ai instance.
To obtain the entitlement key, follow these steps:
1. Access [My IBM](https://myibm.ibm.com/).
2. Click **View Library**.
 3. Click **Add a new key +**.
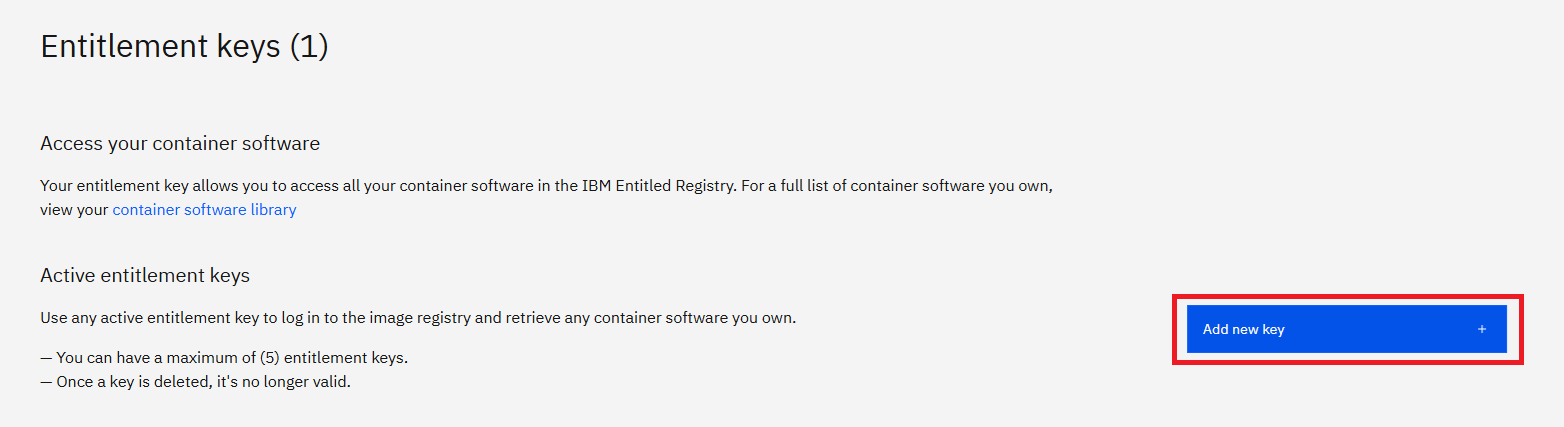 4. Copy the entitlement key.
The API key of your instance. To get your API Key, see [Managing API Keys](https://cloud.ibm.com/docs/account?topic=account-userapikey\&interface=ui#create_user_key).
A watsonx.ai instance on IBM Cloud. This instance is required to setting up the Deployment Space for the watsonx Orchestrate Developer Edition. If you don’t have one, create it and locate your `space ID`. You can create a new instance and get the `space ID` in the [Developer access](https://dataplatform.cloud.ibm.com/developer-access?context=wx) page on IBM Cloud.
```txt .env theme={null}
WO_DEVELOPER_EDITION_SOURCE=myibm
WO_ENTITLEMENT_KEY=
WATSONX_APIKEY=
WATSONX_SPACE_ID=
```
Additionally, if you operate in a region other than us-south, configure the region variables. Set the following variables:
The assistant LMM API endpoint for your region
The assistant embedding API endpoint for your region.
The routing LLM API endpoint for your region.
The watsonx endpoint for your region.
```txt .env theme={null}
ASSISTANT_LLM_API_BASE=https://.ml.cloud.ibm.com/
ASSISTANT_EMBEDDINGS_API_BASE=https://.ml.cloud.ibm.com/
ROUTING_LLM_API_BASE=https://.ml.cloud.ibm.com/
WATSONX_URL=https://.ml.cloud.ibm.com/
```
**Where:**
* ``: refers to the region code for your location. For example: `eu-de`
To authenteticate using a custom image registry:
Create a file named `.env`.
Add the following variables to your `.env` file:
The source ID for the watsonx Orchestrate Developer Edition. Set `custom`.
The URL of the image registry that hosts the watsonx Orchestrate Developer Edition images.
The username for authenticating with the image registry. Leave it blank to skip login.
The password for authenticating with the image registry. Leave it blank to skip login.
```txt .env theme={null}
WO_DEVELOPER_EDITION_SOURCE=custom
REGISTRY_URL=
REGISTRY_USERNAME=
REGISTRY_PASSWORD=
```
Additionally, if you operate in a region other than us-south, configure the region variables. Set the following variables:
The assistant LMM API endpoint for your region
The assistant embedding API endpoint for your region.
The routing LLM API endpoint for your region.
The watsonx endpoint for your region.
```txt .env theme={null}
ASSISTANT_LLM_API_BASE=https://.ml.cloud.ibm.com/
ASSISTANT_EMBEDDINGS_API_BASE=https://.ml.cloud.ibm.com/
ROUTING_LLM_API_BASE=https://.ml.cloud.ibm.com/
WATSONX_URL=https://.ml.cloud.ibm.com/
```
**Where:**
* ``: refers to the region code for your location. For example: `eu-de`
## Optional: Configuring caching layers for on-premises
If you use a watsonx Orchestrate on-premises instance to pull images, you can configure caching layers to speed up Docker image downloads. This setup creates a cache in the ADK watsonx Orchestrate folder and stores all pulled layers. With caching enabled, each layer downloads only once during the cache period, which you control. You can reuse these layers whenever needed. All cached layers appear in the folder located at `/.cache/orchestrate`.
To configure caching layers, add the following environment variable to your `.env` file:
Boolean environment variable that determines whether CPD Docker image layers are cached in the local orchestrate cache during pulls. Defaults to `false`.
```txt .env theme={null}
IGNORE_DOCKER_LAYER_CACHING=false
```
To clean up cached image layers, use the ADK CLI. For more information, see [Cleaning on-premises cache layers](./manage_local_server#cleaning-on-premises-cache-layers).
## Installing watsonx Orchestrate Developer Edition components
Use the `orchestrate start` command to install watsonx Orchestrate Developer Edition components.
Before you begin, ensure the following prerequisites are met:
* [Docker Engine and Docker Compose are installed](#configuring-container-manager)
* [A valid .env file is configured](#configuring-env-file)
This command pulls the required images and creates Docker containers for the selected components. You can install the following:
* [watsonx Orchestrate Developer Edition: watsonx Orchestrate server](#installing-watsonx-orchestrate-developer-edition%3A-watsonx-orchestrate-server)
* [watsonx Orchestrate Developer Edition: Orchestrate copilot server](#installing-watsonx-orchestrate-developer-edition%3A-orchestrate-copilot-server)
**Note:**
* If you encounter issues during installation, see the [Troubleshooting](../release/troubleshooting) section.
* After pulling the images, you can set the WO\_DEVELOPER\_EDITION\_SKIP\_LOGIN environment variable to true to skip ICR login. The CLI uses existing images without downloading new ones.
### Installing watsonx Orchestrate Developer Edition: watsonx Orchestrate server
The watsonx Orchestrate server runs locally on your machine. You can use it to gain more control when developing and debugging your agents.
To install watsonx Orchestrate server, run:
```bash BASH theme={null}
orchestrate server start -e
```
Path to your `.env` file.
Enable Langfuse support.
Enable IBM's native observability framework.
Accept the terms and conditions shown in the logs when the server starts.
Enable IBM Document Processing to extract information from business documents. This activates the Watson Document Understanding service.
Enable voice support.
Enable Langflow support. For more information about Langflow, see [Authoring Langflow tools](../langflow/overview).
Path to a custom certificate bundle file.
Once installed, the following services become available:
* **OpenAPI Docs**: `http://localhost:4321/docs`. This API documentation is also available in the [watsonx Orchestrate Developer Edition APIs](../apis/agent-release-environments/create-an-environment-for-an-agent).
* **API Base URL**: `http://localhost:4321/api/v1`
**Note:**
This command doesn’t start the local UI for watsonx Orchestrate. To start it, run `orchestrate chat start`. For more information, see [Launching the local UI](./manage_local_server#launching-the-local-ui).
You can also use a custom `docker-compose.yml` file to install watsonx Orchestrate server. However, **ADK does not officially support custom configurations. Make sure you understand the changes before proceeding**. For more information, see [Using custom watsonx Orchestrate Developer Edition docker file](./custom_yaml).
### Installing watsonx Orchestrate Developer Edition: Orchestrate copilot server
The Orchestrate copilot server enables the copilot assistant, which helps you build agents and tools through the CLI chat.
To install Orchestrate copilot server, run:
```bash BASH theme={null}
orchestrate copilot start --env-file
```
| Flag | Type | Required | Description |
| ------------------- | ------ | -------- | -------------------------------------------------------------------------------- |
| `--env-file` (`-e`) | string | Yes | The path to an env file containing configuration options for the Copilot server. |
## Stopping watsonx Orchestrate Developer Edition components
Use the `orchestrate stop` command to stop a watsonx Orchestrate Developer Edition components.
**Note:**
After stopping a component, run the installation command again to restart it.
### Stopping watsonx Orchestrate Developer Edition: watsonx Orchestrate server
To stop watsonx Orchestrate server, run:
```bash BASH theme={null}
orchestrate server stop
```
### Stopping watsonx Orchestrate Developer Edition: Orchestrate copilot server
To stop Orchestrate copilot server, run:
```bash BASH theme={null}
orchestrate copilot stop
```
## Uninstalling watsonx Orchestrate Developer Edition components
To uninstall all watsonx Orchestrate Developer Edition components, reset the server and then remove the containers using Docker.
Run the following command to reset the server:
```bash BASH theme={null}
orchestrate server reset
```
Run the following command to remove all containers and volumes:
```bash BASH theme={null}
docker system prune -a --volumes
```
## What's Next?
After installing watsonx Orchestrate Developer Edition, you can use server commands in the ADK CLI to interact with the platform. For more details, see the ADK CLI documentation.
* [watsonx Orchestrate Developer Edition: watsonx Orchestrate server commands](./manage_local_server)
* [watsonx Orchestrate Developer Edition: Orchestrate copilot server commands](../_releases/1.15.0/copilot/creating_agent)
You can also use the watsonx Orchestrate Developer Edition APIs to support agent development and testing. For more information, see [watsonx Orchestrate Developer Edition APIs](../apis/orchestrate-agent/chat-with-orchestrate-assistant-as-stream).
4. Copy the entitlement key.
The API key of your instance. To get your API Key, see [Managing API Keys](https://cloud.ibm.com/docs/account?topic=account-userapikey\&interface=ui#create_user_key).
A watsonx.ai instance on IBM Cloud. This instance is required to setting up the Deployment Space for the watsonx Orchestrate Developer Edition. If you don’t have one, create it and locate your `space ID`. You can create a new instance and get the `space ID` in the [Developer access](https://dataplatform.cloud.ibm.com/developer-access?context=wx) page on IBM Cloud.
```txt .env theme={null}
WO_DEVELOPER_EDITION_SOURCE=myibm
WO_ENTITLEMENT_KEY=
WATSONX_APIKEY=
WATSONX_SPACE_ID=
```
Additionally, if you operate in a region other than us-south, configure the region variables. Set the following variables:
The assistant LMM API endpoint for your region
The assistant embedding API endpoint for your region.
The routing LLM API endpoint for your region.
The watsonx endpoint for your region.
```txt .env theme={null}
ASSISTANT_LLM_API_BASE=https://.ml.cloud.ibm.com/
ASSISTANT_EMBEDDINGS_API_BASE=https://.ml.cloud.ibm.com/
ROUTING_LLM_API_BASE=https://.ml.cloud.ibm.com/
WATSONX_URL=https://.ml.cloud.ibm.com/
```
**Where:**
* ``: refers to the region code for your location. For example: `eu-de`
To authenteticate using a custom image registry:
Create a file named `.env`.
Add the following variables to your `.env` file:
The source ID for the watsonx Orchestrate Developer Edition. Set `custom`.
The URL of the image registry that hosts the watsonx Orchestrate Developer Edition images.
The username for authenticating with the image registry. Leave it blank to skip login.
The password for authenticating with the image registry. Leave it blank to skip login.
```txt .env theme={null}
WO_DEVELOPER_EDITION_SOURCE=custom
REGISTRY_URL=
REGISTRY_USERNAME=
REGISTRY_PASSWORD=
```
Additionally, if you operate in a region other than us-south, configure the region variables. Set the following variables:
The assistant LMM API endpoint for your region
The assistant embedding API endpoint for your region.
The routing LLM API endpoint for your region.
The watsonx endpoint for your region.
```txt .env theme={null}
ASSISTANT_LLM_API_BASE=https://.ml.cloud.ibm.com/
ASSISTANT_EMBEDDINGS_API_BASE=https://.ml.cloud.ibm.com/
ROUTING_LLM_API_BASE=https://.ml.cloud.ibm.com/
WATSONX_URL=https://.ml.cloud.ibm.com/
```
**Where:**
* ``: refers to the region code for your location. For example: `eu-de`
## Optional: Configuring caching layers for on-premises
If you use a watsonx Orchestrate on-premises instance to pull images, you can configure caching layers to speed up Docker image downloads. This setup creates a cache in the ADK watsonx Orchestrate folder and stores all pulled layers. With caching enabled, each layer downloads only once during the cache period, which you control. You can reuse these layers whenever needed. All cached layers appear in the folder located at `/.cache/orchestrate`.
To configure caching layers, add the following environment variable to your `.env` file:
Boolean environment variable that determines whether CPD Docker image layers are cached in the local orchestrate cache during pulls. Defaults to `false`.
```txt .env theme={null}
IGNORE_DOCKER_LAYER_CACHING=false
```
To clean up cached image layers, use the ADK CLI. For more information, see [Cleaning on-premises cache layers](./manage_local_server#cleaning-on-premises-cache-layers).
## Installing watsonx Orchestrate Developer Edition components
Use the `orchestrate start` command to install watsonx Orchestrate Developer Edition components.
Before you begin, ensure the following prerequisites are met:
* [Docker Engine and Docker Compose are installed](#configuring-container-manager)
* [A valid .env file is configured](#configuring-env-file)
This command pulls the required images and creates Docker containers for the selected components. You can install the following:
* [watsonx Orchestrate Developer Edition: watsonx Orchestrate server](#installing-watsonx-orchestrate-developer-edition%3A-watsonx-orchestrate-server)
* [watsonx Orchestrate Developer Edition: Orchestrate copilot server](#installing-watsonx-orchestrate-developer-edition%3A-orchestrate-copilot-server)
**Note:**
* If you encounter issues during installation, see the [Troubleshooting](../release/troubleshooting) section.
* After pulling the images, you can set the WO\_DEVELOPER\_EDITION\_SKIP\_LOGIN environment variable to true to skip ICR login. The CLI uses existing images without downloading new ones.
### Installing watsonx Orchestrate Developer Edition: watsonx Orchestrate server
The watsonx Orchestrate server runs locally on your machine. You can use it to gain more control when developing and debugging your agents.
To install watsonx Orchestrate server, run:
```bash BASH theme={null}
orchestrate server start -e
```
Path to your `.env` file.
Enable Langfuse support.
Enable IBM's native observability framework.
Accept the terms and conditions shown in the logs when the server starts.
Enable IBM Document Processing to extract information from business documents. This activates the Watson Document Understanding service.
Enable voice support.
Enable Langflow support. For more information about Langflow, see [Authoring Langflow tools](../langflow/overview).
Path to a custom certificate bundle file.
Once installed, the following services become available:
* **OpenAPI Docs**: `http://localhost:4321/docs`. This API documentation is also available in the [watsonx Orchestrate Developer Edition APIs](../apis/agent-release-environments/create-an-environment-for-an-agent).
* **API Base URL**: `http://localhost:4321/api/v1`
**Note:**
This command doesn’t start the local UI for watsonx Orchestrate. To start it, run `orchestrate chat start`. For more information, see [Launching the local UI](./manage_local_server#launching-the-local-ui).
You can also use a custom `docker-compose.yml` file to install watsonx Orchestrate server. However, **ADK does not officially support custom configurations. Make sure you understand the changes before proceeding**. For more information, see [Using custom watsonx Orchestrate Developer Edition docker file](./custom_yaml).
### Installing watsonx Orchestrate Developer Edition: Orchestrate copilot server
The Orchestrate copilot server enables the copilot assistant, which helps you build agents and tools through the CLI chat.
To install Orchestrate copilot server, run:
```bash BASH theme={null}
orchestrate copilot start --env-file
```
| Flag | Type | Required | Description |
| ------------------- | ------ | -------- | -------------------------------------------------------------------------------- |
| `--env-file` (`-e`) | string | Yes | The path to an env file containing configuration options for the Copilot server. |
## Stopping watsonx Orchestrate Developer Edition components
Use the `orchestrate stop` command to stop a watsonx Orchestrate Developer Edition components.
**Note:**
After stopping a component, run the installation command again to restart it.
### Stopping watsonx Orchestrate Developer Edition: watsonx Orchestrate server
To stop watsonx Orchestrate server, run:
```bash BASH theme={null}
orchestrate server stop
```
### Stopping watsonx Orchestrate Developer Edition: Orchestrate copilot server
To stop Orchestrate copilot server, run:
```bash BASH theme={null}
orchestrate copilot stop
```
## Uninstalling watsonx Orchestrate Developer Edition components
To uninstall all watsonx Orchestrate Developer Edition components, reset the server and then remove the containers using Docker.
Run the following command to reset the server:
```bash BASH theme={null}
orchestrate server reset
```
Run the following command to remove all containers and volumes:
```bash BASH theme={null}
docker system prune -a --volumes
```
## What's Next?
After installing watsonx Orchestrate Developer Edition, you can use server commands in the ADK CLI to interact with the platform. For more details, see the ADK CLI documentation.
* [watsonx Orchestrate Developer Edition: watsonx Orchestrate server commands](./manage_local_server)
* [watsonx Orchestrate Developer Edition: Orchestrate copilot server commands](../_releases/1.15.0/copilot/creating_agent)
You can also use the watsonx Orchestrate Developer Edition APIs to support agent development and testing. For more information, see [watsonx Orchestrate Developer Edition APIs](../apis/orchestrate-agent/chat-with-orchestrate-assistant-as-stream).